Home > PDF Creator
PDF Creator
ARForms has new extension which creates PDF of form entries. PDF Creator For ARForms is just another WordPress plugin which you can install and manage just like other WordPress plugins.
PDF creator For ARForms plugin integrates your form entries and PDF creation in a single process. You can send generated PDF as an attachment with an email to the administrator as well as users immediately after form submission from ARForms.
The best part of this extension is, you can customize PDF templates as per your requirement by just using PDF Template Editor. No, any programming skill required!
Note:Please meet minimum requirement of PHP version 5.6, WordPress version 4.5 and ARForms version 3.3.2.
ARForms – PDF Creator Addon Key Features
- Save PDF File on user submission of a ARForms so it can be attached to a notification to administrator as well as users
- Multiple PDF Templates
- Real-time PDF Template Editor to customize according to your requirement
- View and download a PDF via the administrator interface
- Language Support – almost all languages are supported including RTL (right to left) languages like Arabic and CJK languages – Chinese, Japanese and Korean.
- UTF-8 encoded HTML
- Page Numbering
Server Requirements
- PHP 5+
- MB String
- GD Library
Steps For Installation And Activation
- New install via FTP
- New install via the WordPress Uploader
a. Download the plugin from CodeCanyon, and extract it. You should find a directory arformspdfcreator.
b. In your WordPress installation, upload arformspdfcreator to wp-content/plugins/
c. Activate the "PDF Creator For ARForms" plugin through the Plugins menu from WordPress admin panel.
a. Download the plugin from CodeCanyon
b. Log in to your WordPress admin panel
c. go to Plugins -> Add New -> Upload
d. Click on choose file and browse the download package from CodeCanyon. When the plugin uploads successfully, click on Activate Plugin link.
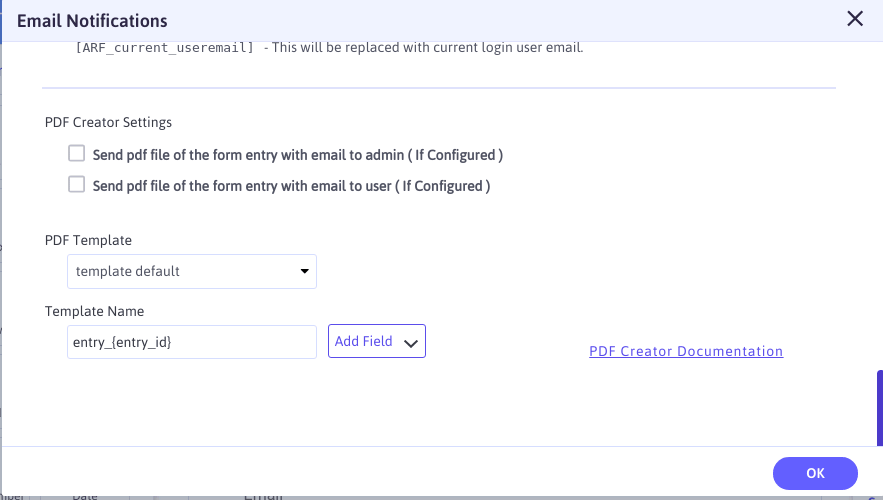
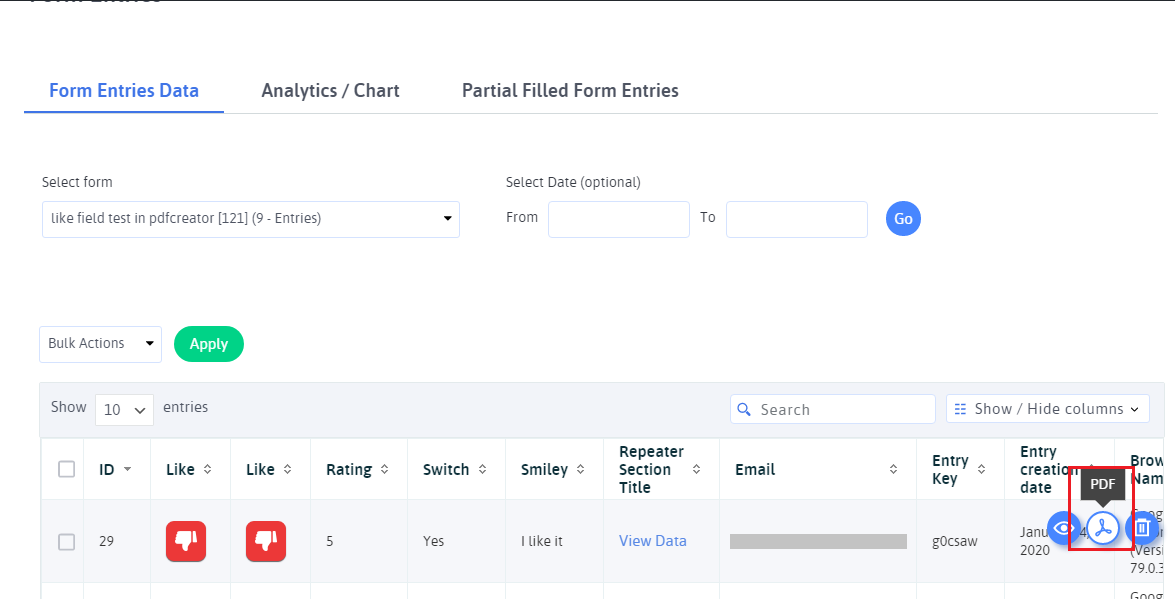
After activating the plugin, you will be able to see new PDF Template Editor menu is added where you can add or customize templates. Go to “ARForms” and click on any existing form and then go to “Email Notifications”. You will see PDF Creator settings under “Auto Response Email” settings. Also, you will be able to see PDF icon in entries listing.
PDF Configuration
Configuration for PDF will take just 5 minutes with ARForms.
To configure PDF, click on the form for which you want to generate PDF after form submission.
Go to Email Notifications under the Auto Response Email settings..
Tick the checkbox near “Send pdf file of the form entry with email to admin ( If Configured )” if you want to send PDF as an attachment with email notification to the administrator.
Tick the checkbox near “Send pdf file of the form entry with email to user ( If Configured )” if you want to send PDF as an attachment with email notification to user who has submitted the form.
Note: Please confirm that you checked for “Send an automatic response to users after submitting the form” AND “Send an automatic response to admin after submitting the form”. If you did not check for this options, users and administrator will not be notified after form is submitted so PDF will not be sent as an attachment.
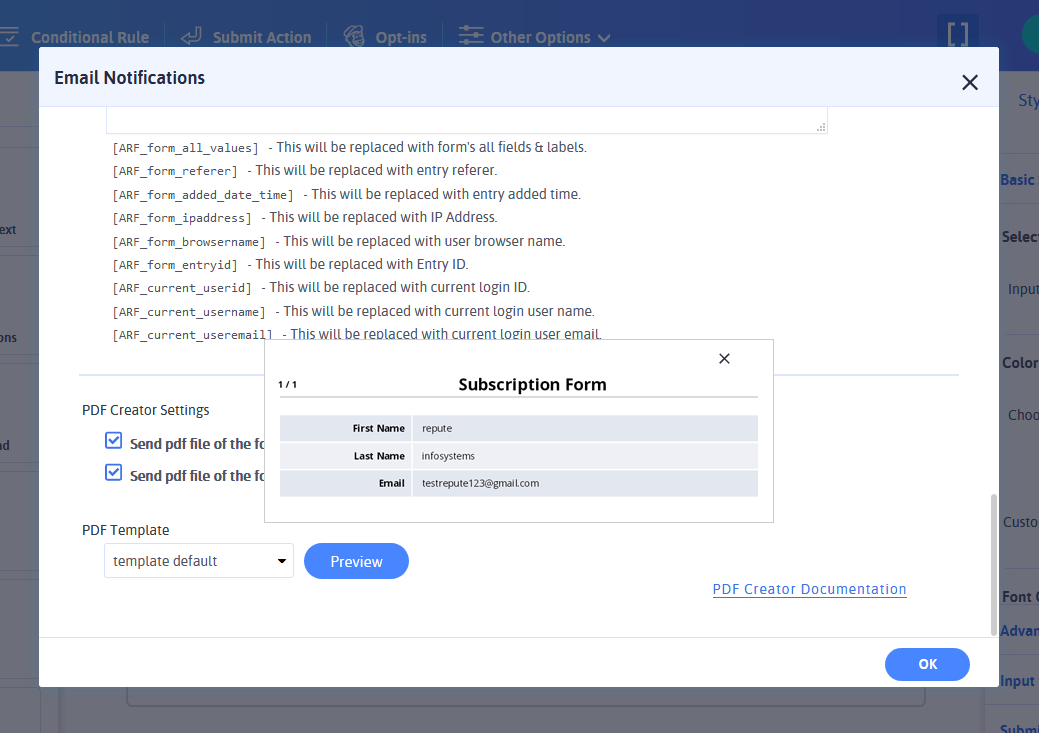
You can generate PDF with two different templates.
- Template 1:
- Template 2:
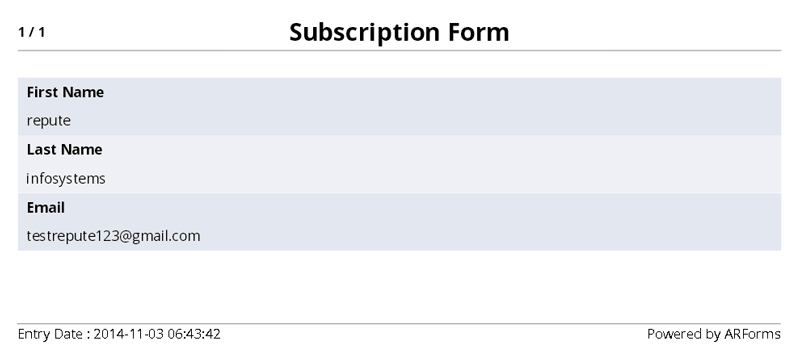
By selecting this option you will get generated PDF like below image:
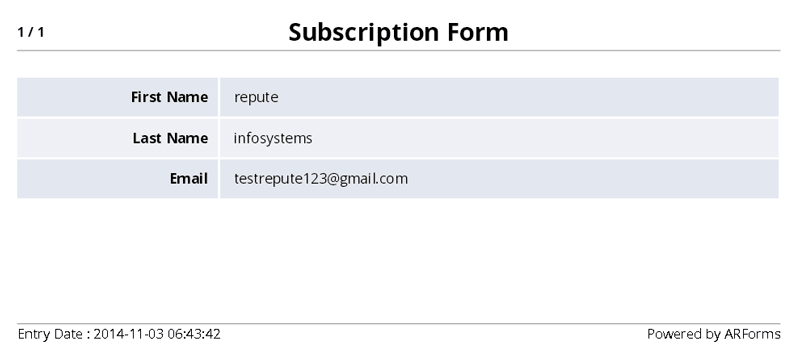
By selecting this option you will get generated PDF like below image:
Template Name
Here you have another option to enter your PDF Template Name to use when download PDF or PDF is sent with email.
You can use shortcode in name like entry_id, date, time as well as form fields.
Add/Customize PDF Templates
Now, you may want to add a new template or customize the existing template then please go to PDF Template Editor from left menus where you have lots of customization options.
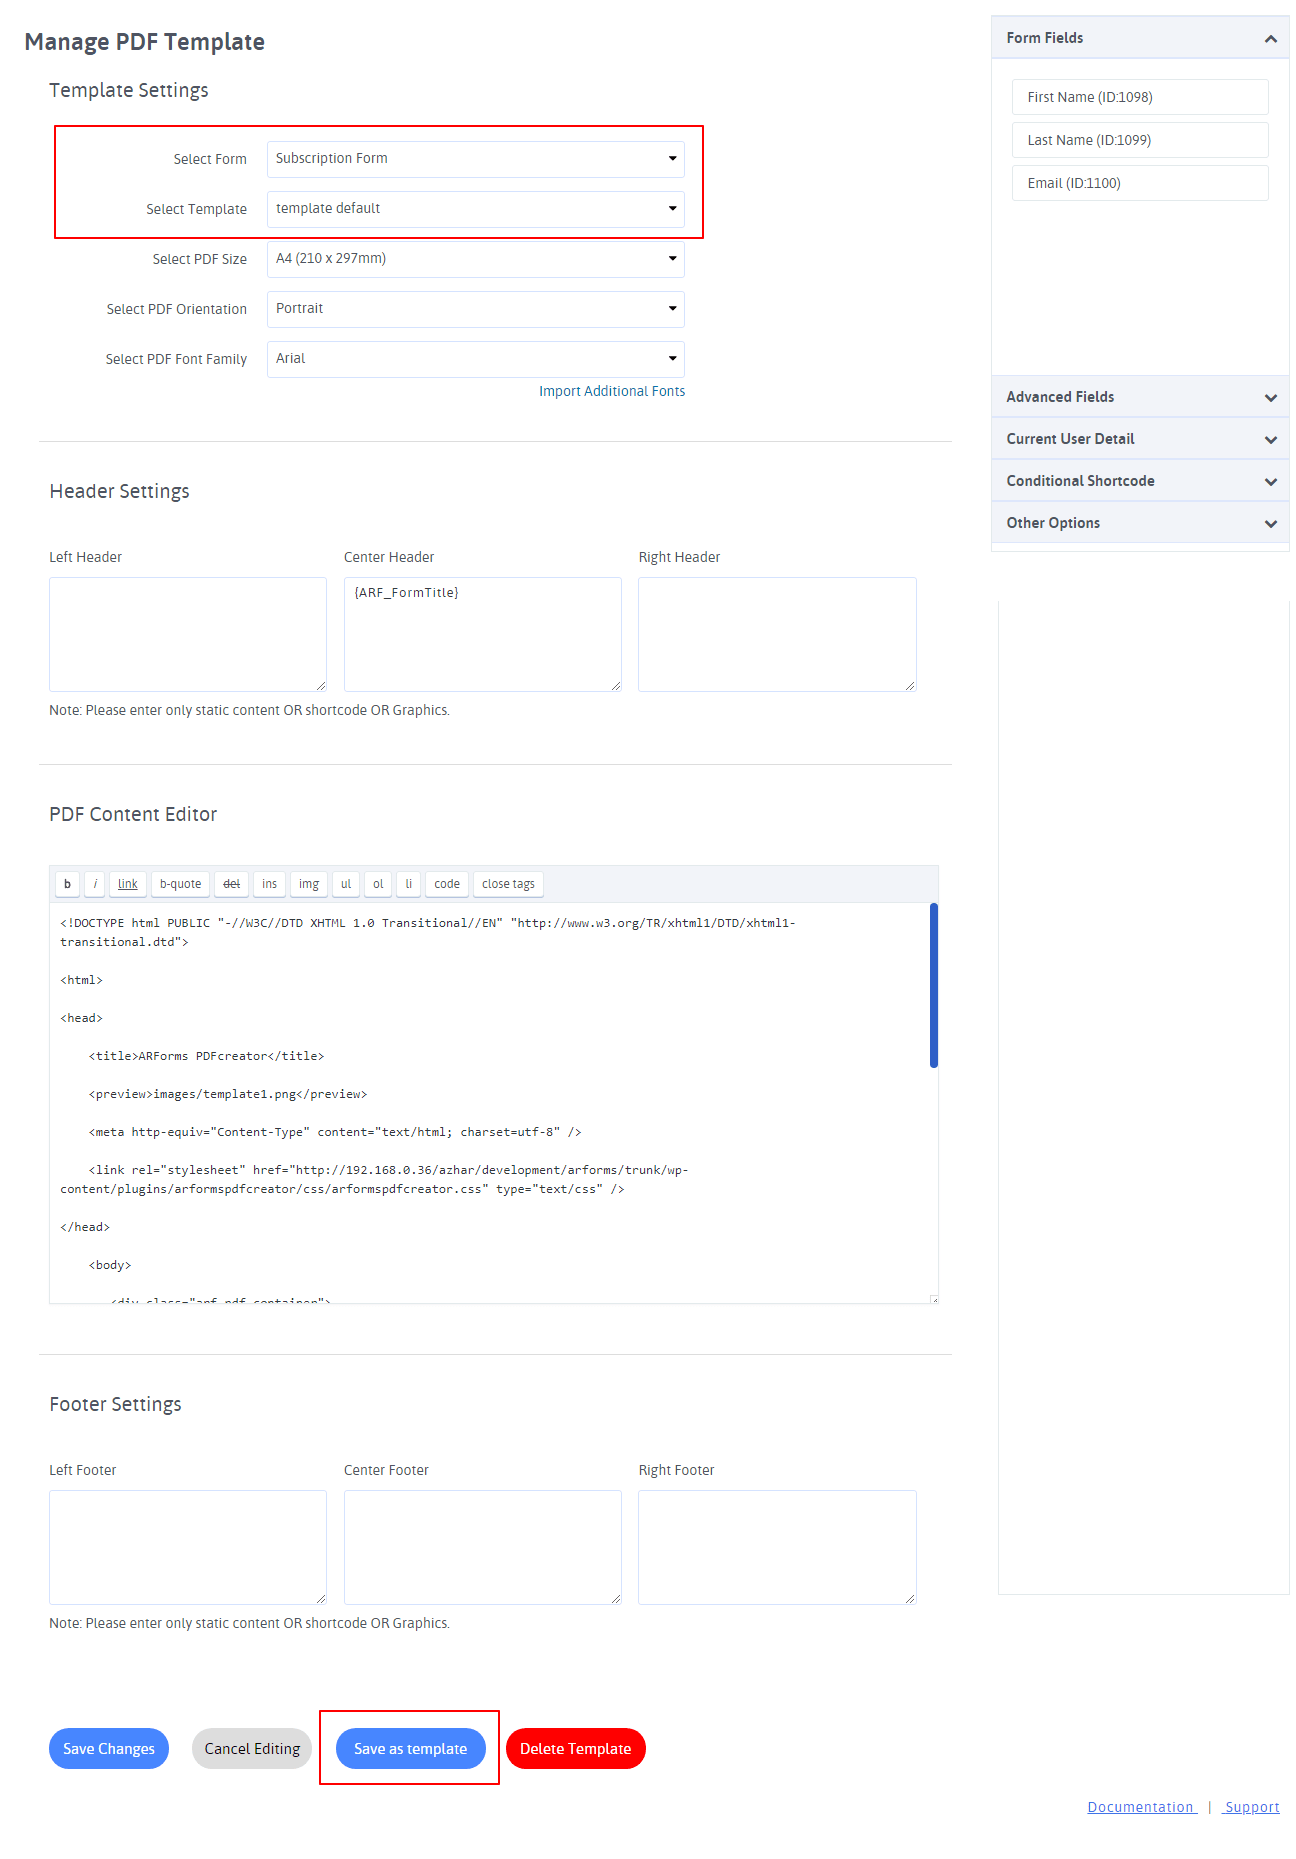
Here you will see different sections like Template Settings, Header Settings, Footer Settings, etc… where HTML content can be customized. Let’s see each in detail.
Template Settings
If you need to add/customize a PDF template for a particular form then please Select Form here. After selecting a particular form you will have all fields available at right sidebar in the Form Fields tab. Now you can add fields in your template content easily by just click on those fields.
You may either customize an existing template or add a new template. So if you want an existing PDF template to be customized then Select Template.
The same way you can set other settings for your selected or new template like PDF Size, PDF Orientation, PDF Font Family. Here you may also Import Additional Fonts by click on link below font input.
Header Settings / Footer Settings
Add or change in header and footer sections from Header Settings and Footer Settings where you have three portions available for left, center and right side. You can add shortcodes from right sidebar easily in these sections too.
PDF Content Editor
If you have selected any existing PDF template then you will see default content here which can be customized. Following are some important classes that will be helpful to format PDF content as you can see in default template content.
two_row_even => css class for even rows
two_row_odd => css class for odd rows
arf_pdf_viewentry_left => will be used for label column
arf_pdf_viewentry_right => will be used for values column
arf_pdf_container => main class for PDF output
arf_field_values => main outer div class for values
For all these classes CSS Properties are placed at wp-content/plugins/arformspdfcreator/css/arformspdfcreator.css where you can change or add new CSS Properties.
Right Sidebar
There is a sidebar in right which makes PDF template customization very easy.
Here you will see following expandable tabs.
- Form Fields
- Advanced Fields
- Current User Detail
- Conditional Shortcodes
- Other Option
Here is the list of all form fields for selected form with its unique field id. Click on any field to add the shortcode in content editor or header/footer sections wherever the cursor is placed. Shortcodes for the field will be like, {ARF_GetLabel:ID}:{ARF_GetValue:ID}. You can get more detail at Shortcodes section.
This tab contains list that adds advanced shortcodes like Browser – {ARF_Browser}, IP Address – {ARF_IPAddress}, Page URL – {ARF_PageURL} etc… These shortcodes are also described in section Shortcodes.
If you need to add shortcodes that can be replaced with the detail of the user who has submitted the form then here you have a list of shortcodes like User ID – {ARF_UserID}, User Email – {ARF_UserEmail}, User Name – {ARF_UserName}, User Display Name – {ARF_UserDisplayName}. Get more detail for these shortcodes from Shortcodes section.
This tab contains all conditional and looping shortcodes like the following which are also described at Shortcodes section.
[ARF_IF] /*Your code goes here*/ [/ARF_IF]
[ARF_LOOP] /*Your code goes here*/ [/ARF_LOOP].
Other useful options are available here which help you to make your header section and footer section perfect.
1). Enable Page No :
Switch ON to enable this option if you need to display page number in footer at right portion. Please note that your right-footer content added in the editor will not be displayed there if the page number is enabled.
2). Upload Logo :
You are able to upload a logo image to be displayed at the header section which can be positioned to left, center or right from Logo Position.
After all the changes, you will see buttons at the bottom. Let’s see the purpose of each button.
Save Changes :
If you have selected any existing template to be customized and want to save changes in same template then you need to click on this button.
Cancel Editing :
Click on this button if you need to reset all changes and settings.
Save as template :
If you need to add a new template then click on this button no matter if you have selected the existing template or not. On click this button you will be asked to enter Template Name for a new PDF template.
Delete Template :
At last, this button will only be visible if you have selected the existing template or after save as a new template. On click this button your selected PDF template will be removed.
Shortcodes
Form Fields Shortcodes
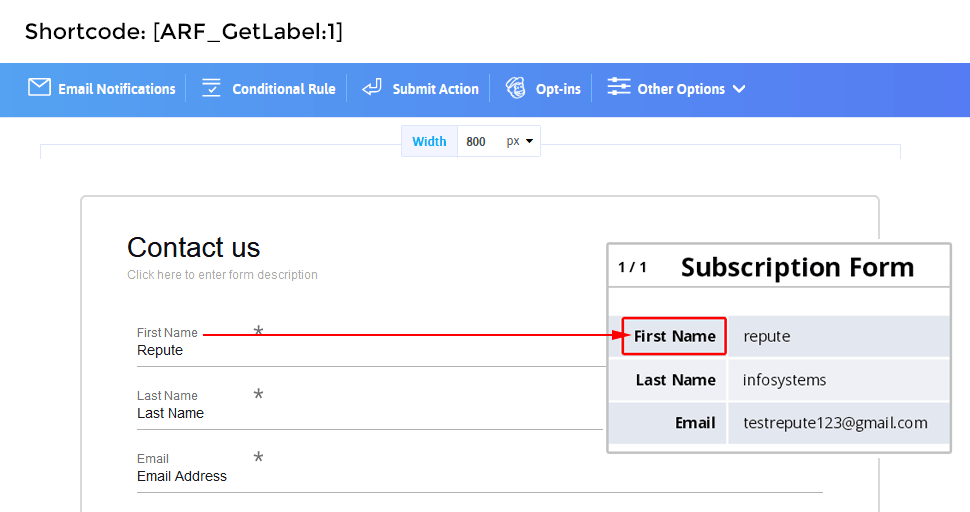
[ARF_GetLabel:ID]
ARF_GetLabel : This Shortcode is used to perform custom operations with Field label in PDF. For Example, [ARF_GetLabel:1] this will display label first field of form.
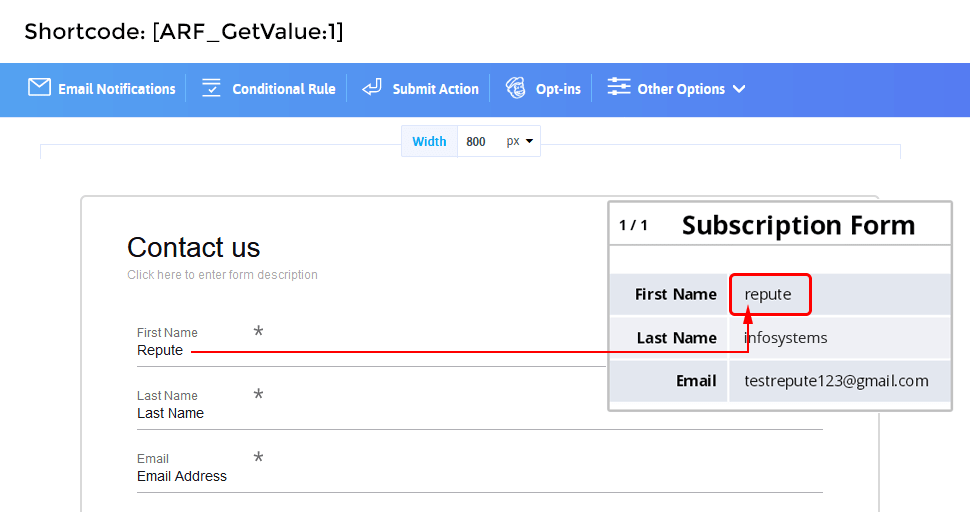
[ARF_GetValue:ID]
This Shortcode is used to perform custom operations with Field Values in PDF. For Example, [ARF_GetValue:1] this will display first field of value from form.
Advanced Fields Shortcodes
{ARF_Browser} : Use this shortcode to display Browser of created entry.
{ARF_IPAddress} : Use this shortcode to display IP address of created entry.
{ARF_PageURL} : Use this shortcode to display page URL used to create entry.
{ARF_ReferrerURL} : Use this shortcode to display referral URL inserted with entry.
{ARF_Country} : Use this shortcode to display country of created entry.
{ARF_EntryCreationDate} : Use your entry creation date anywhere in PDF by using this shortcode.
{ARF_GetEntryID} : You can use your Entry ID anywhere in PDF by using this shortcode. For example you want to print Invoice ID in PDF at that time, it will be helpful.
CURRENT USER DETAIL
{ARF_UserID} : This shortcode will be replaced with the user’s ID who has submitted the form.
{ARF_UserEmail} : This shortcode will be replaced with the user’s email address who has submitted the form.
{ARF_UserName} : This shortcode will be replaced with the username who has submitted the form.
{ARF_UserDisplayName} : This shortcode will be replaced with the user’s display name who has submitted the form.
Please note that, if form is submitted by anonymous (non-logged in) user then these shortcodes will be replaced with blank value.
Conditional Shortcodes
{ARF_IF}…{/ARF_IF}
This Shortcode is used for to place conditions based on field label and its value.
For Example,
1) {ARF_IF [ARF_GetLabel:1]==First Name} => Code will be executed between two if shortcode ( Open and close tags ) Only and only if first field’s Label will be “Full Name”. You can use Not Equal to Condition like, {ARF_IF [ARF_GetLabel:1]!=Full Name} then condition will be true if first field’s value will not equal to “Full Name”.
2) {ARF_IF [ARF_GetValue:1]==Repute} => Code will be executed between two if shortcode ( Open and close tags ) Only and only if first field’s Value will be “Repute”. You can use Not Equal to Condition like, {ARF_IF [ARF_GetValue:1]!=Repute} then condition will be true if first field’s value will not equal to “Repute”.
you can user IF inside loop, for Example,
{ARF_IF [ARF_GetLabel:VAR]==Full Name}
…HTML CONTENT…
{/ARF_IF}
for check label name not in loop then,
{ARF_IF [ARF_GetLabel:VAR]!=Full Name}
…HTML CONTENT…
{/ARF_IF}
for check value in loop then,
{ARF_IF [ARF_GetValue:VAR]==Repute}
…HTML CONTENT…
{/ARF_IF}
for check value not in loop then,
{ARF_IF [ARF_GetValue:VAR]!=Repute}
…HTML CONTENT…
{/ARF_IF}
We also provide ODD/EVEN row for content in loop, use of MOD in Even rows with ARForms PDF Creator is like,
{ARF_IF [VAR MOD 2==0]}
…HTML CONTENT…
{/ARF_IF}
to use MOD in Odd rows with ARForms PDF Creator is like,
{ARF_IF [VAR MOD 2==1]}
…HTML CONTENT…
{/ARF_IF}
[ARF_LOOP]…[/ARF_LOOP]
This Shortcode is used for to print Label and Values in PDF using loop. To print all records using loop then just need to add [ARF_LOOP] [/ARF_LOOP] for labels and values.
For Example,
If you want to display only first five fields from loop then you can use like this,
[ARF_LOOP VAR=1 TO VAR=5]
…HTML CONTENT…
[/ARF_LOOP]
If you want to display only first five fields from loop with descending order then you can use like this,
[ARF_LOOP VAR=5 TO VAR=1]
…HTML CONTENT…
[/ARF_LOOP]
To display a Label inside loop than you need to write [ARF_GetLabel:VAR]
To display a Value inside loop than you need to write [ARF_GetValue:VAR]
Changelog
Version 3.1 (23 January, 2020)
- Minor bug fixes
Version 3.0 (13 January, 2020)
- Minor bug fixes
Version 2.9 (03 January, 2020)
- Added compatibility for ARForms version 4.0
- Minor bug fixes
Version 2.8 (16 October, 2019)
- Minor bug fixes
Version 2.7 (27 May, 2015)
- Fix multi-language issue in the PDF attached in email
- Minor bug fixes
Version 2.6 (10 May, 2019)
- Updated mpdf library with version 6.1
- Remove compatibility of ARForms version lower than 3.3.2
- Minor bug fixes
Version 2.5 (22 December, 2018)
- Added compatibility with Gutenberg Editor
- Minor bug fixes
Version 2.4 (06 Sep, 2018)
- Minor bug fixes
Version 2.3 (10 July, 2018)
- Minor bug fixes
Version 2.2 (13 June, 2018)
- Minor bug fixes
Version 2.1 (09 June, 2018)
- Minor bug fixes
Version 2.0 (01 June, 2018)
- Add real-time PDF Template Editor to make template customization easy.
- Add new facility to set PDF Name.
- Minor bug fixes.
Version 1.6 (27 Feb, 2018)
- Minor bug fixes
Version 1.5 (16 Feb, 2018)
- Minor bug fixes
Version 1.4 (19 Jan, 2018)
- Minor bug fixes
Version 1.3 (27 Nov, 2017)
- Updated mpdf library with version 6.0.
- Added compatibility with ARForms Version 3.0
- Other Minor bug fixes.
Version 1.2 (25 Jan, 2017)
- Updated mpdf library with compatible to PHP version 7 and above.
- Other Minor bug fixes.
Version 1.1.2 (28 Oct, 2016)
- Small bug fixes
Version 1.1.1 (13 May, 2015)
- Added support for ARForms Digital Signature Image in PDF.
- Other small bug fixes.
Version 1.1 (08 November, 2014)
- Added Template Customization Support
- PDF will send as a attachement with user notification also.