The Difference between Datepicker and Timepicker
Share:


Today, we have the recipe of perfect form building! Don’t worry as this blog is here with all the answers to tricky questions! Here, you will clearly understand the difference between a datepicker and timepicker. This blog will explain you easily and give you live instances wherein you can use a date picker vs time picker.
This might seem like a very minute thing but beauty is always in the details. Choosing the right tools enhances your form and gives you the exact details. So, it becomes crucial for you to understand the difference well.

To put it simply, a date picker helps users pick a date. This is a user interface tool that pops a calendar for an accurate date selection. Now, why to leverage the power of date pickers?

To put it simply, a time picker lets you pick a time. For selecting a date, you get a yearly calendar view. Similarly, for the time picker, you would see the option of hours and minutes. From this, you can make your exact time selection. How is a timepicker essential for your business?
Step-1: Download ARForms Plugin
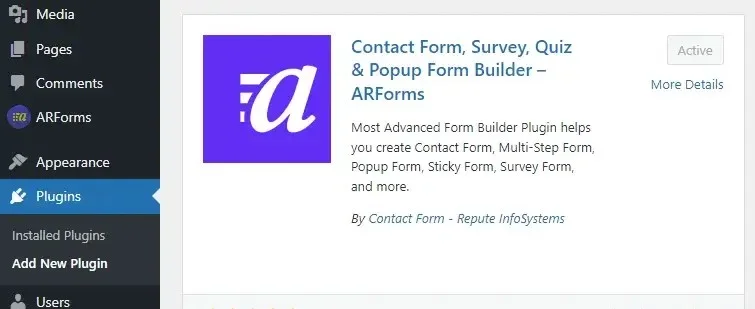
Are you ready to activate the ARForms, Contact Form Plugin? Then download it from the Plugin Directory and install+activate it to move ahead.
Step-2 Add New Form and Details
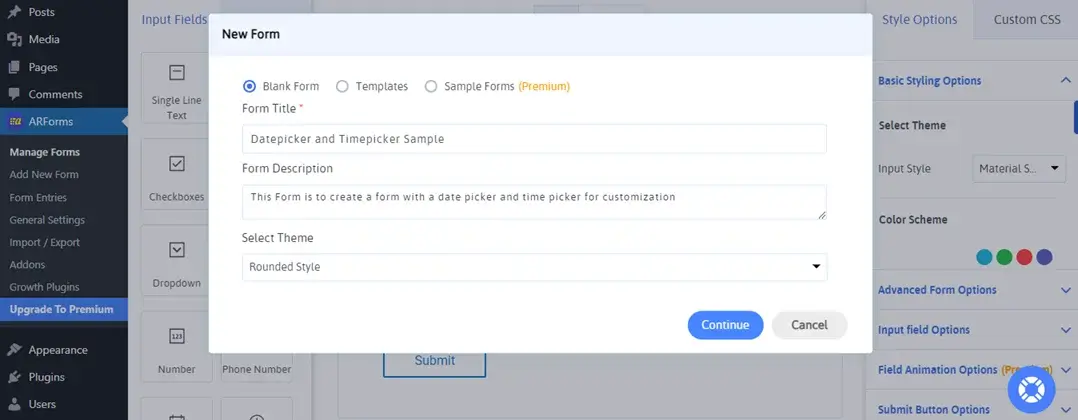
Now, go to ARForms from the left-side panel and add a new form. Add the Form Details of the title, and description, and choose a theme. You can even opt for a template for quick customization.
Step-3 Start Creating Form Fields

Now, it’s the exciting time to start creating your Form. I am creating a very simple and easy form for Hair Salon Services that needs users to select their date and time of appointment. All the required fields like Name, Contact, Batch, Services, and so on will be added for ease. Post that, it’s time to add our date section and time section for a perfect form.
Step-4 Adding the Date Field
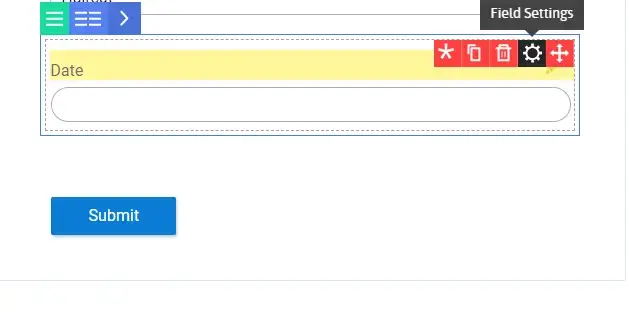
Once you add the date field, you get an exclusive option of settings by hovering above the field. To edit the date field features smoothly, click on settings.
Now, just as we added the date field and clicked on settings, simply add the time field. Further, click on the settings option to edit and explore the advanced features.
Edit the settings based on your requirements to perfect the form. Choose the 12 or 24-hour format for the field as per users simplicity.
Now, all you have to do is click on Save Form and it will be perfectly ready to use.
Step-6 Copy and Publish the Form
After saving the form, go to Manage Forms. Here, you will see our created form. Now, go over the shortcodes and click on it to copy it easily.
Choose a specific page, post, or location to display the form on your website to make it publicly accessible. There, paste the shortcode and publish/update the page/post and your form will be ready in no time.
Check how the date picker deactivates Friday, Saturday, and Sunday as per our settings and displays the current date as well. That’s what an advanced and perfect form looks like.
Based on the selection of a 12-hour format, the time-picker is accurate and works well.
Now, let’s edit our form for merging the date and time-picking tasks smoothly. For that, go to manage forms and click on the edit icon to edit the form.
Delete the time-picker section and go to the settings menu of the date-picker tool. Activate the time picker option and set your format. Save the form and refresh the post/page/location where you passed the shortcode for a perfect output using just one tool.
Check how you can access the calendar as well as the time-picker tool from one place itself. Here, you can set a very particular feature. That is its format of twelve or twenty-four hours.
This is a time-savior if you want to allow selection of any time for your service!
Are you looking for more advanced features and suggestions? Go through our blog to find out the best of the world of WordPress and be inspired.
This might seem like a very minute thing but beauty is always in the details. Choosing the right tools enhances your form and gives you the exact details. So, it becomes crucial for you to understand the difference well.
What is a Datepicker?
To put it simply, a date picker helps users pick a date. This is a user interface tool that pops a calendar for an accurate date selection. Now, why to leverage the power of date pickers?
- In manual typing, every person writes in their own unique way resulting in multiple data formats.
- Every individual has a different method of writing dates. MM/DD/YYYY, MM/YY, DD/MM/YYYY and so on. Using a datepicker allows you to have uniformity in your data records.
- Sets a range in which a date can be easily selected. Allow only the selection of future dates for smooth functioning. Easily restrict the selection of specific dates for easy working.
When is a Date Picker Commonly Used?
- Booking Systems: For booking platforms like movies, hotels, flight bookings, and events, a datepicker is commonly found for simplified bookings. This allows you to swiftly choose a start and end date.
- Scheduling Apps: For service businesses like salons, hairdressers, fitness classes, and online schools, date pickers are ideal and required.
- Forms: Multiple registration forms use a date picker to capture birth dates or any preferred dates for perfect record keeping of data.
What is a Timepicker?
To put it simply, a time picker lets you pick a time. For selecting a date, you get a yearly calendar view. Similarly, for the time picker, you would see the option of hours and minutes. From this, you can make your exact time selection. How is a timepicker essential for your business?
- Manually, there are chances of multiple time selection that can overwhelm you.
- Herein, people are free to write as they please.
- With a timepicker, there is uniformity in data collection. This will enhance the organization and efficiency of your functions.
Where is a Timepicker Used Commonly?
- Scheduling Meetings: To schedule a meeting or a specific appointment, a time picker allows an accurate selection of time that is beneficial to both the user and the other party.
- Alarm Clocks: In applications like alarms and reminders, you usually get a time picker that allows you to set an exact time without any manual worry.
- Booking Services: Medical offices, travel agents, psychologists, and consultants need to use a time picker so that clients can pick an exact time.
Key Differences Between Datepicker and Timepicker
I am sure you are clear about the basic meaning and utility of datepicker and timepicker tools. Let us now understand how exactly they are different.| Difference | Date Picker | Time Picker |
| Purpose | This is for selecting a specific date in a specified format | This tool is used for selecting a time |
| UI Design | A Yearly calendar with options for date, year, and month selection | A clock or a scrolling selection option |
| Customization Options | Choose the available date range to select from. You can even disable selected dates because of unavailability or other booking | Choose an interval time, choose a 12 or 24-hour format, and provide options for AM/PM |
| Utility | Mostly used in booking systems and registration forms | Used in alarms, reminders, appointment scheduling |
When to Use a Datepicker vs. a Timepicker
Understand your requirements of datepicker and timepicker well for smooth management. Based on that, you can easily select whether a date picker would suit your needs or a time picker.- Use a Datepicker When... You need to get specific dates like travel bookings, flight bookings, event registration, and workshop registration.
- Use a Timepicker When...You want specific time bookings for services like hair, nail, beauty, and car wash services.
Popular Datepicker and Timepicker Plugins
For WordPress or JavaScript, here is a list of tools and plugins that would help you add a date picker or a time picker to your website.Leveraging ARForms with inbuilt Date and Time Picker
Let us now use ARForms to create a Form that has both, datepicker and time picker sections. That too, is completely free!Step-1: Download ARForms Plugin
Are you ready to activate the ARForms, Contact Form Plugin? Then download it from the Plugin Directory and install+activate it to move ahead.
Step-2 Add New Form and Details
Now, go to ARForms from the left-side panel and add a new form. Add the Form Details of the title, and description, and choose a theme. You can even opt for a template for quick customization.
Step-3 Start Creating Form Fields
Now, it’s the exciting time to start creating your Form. I am creating a very simple and easy form for Hair Salon Services that needs users to select their date and time of appointment. All the required fields like Name, Contact, Batch, Services, and so on will be added for ease. Post that, it’s time to add our date section and time section for a perfect form.
Step-4 Adding the Date Field
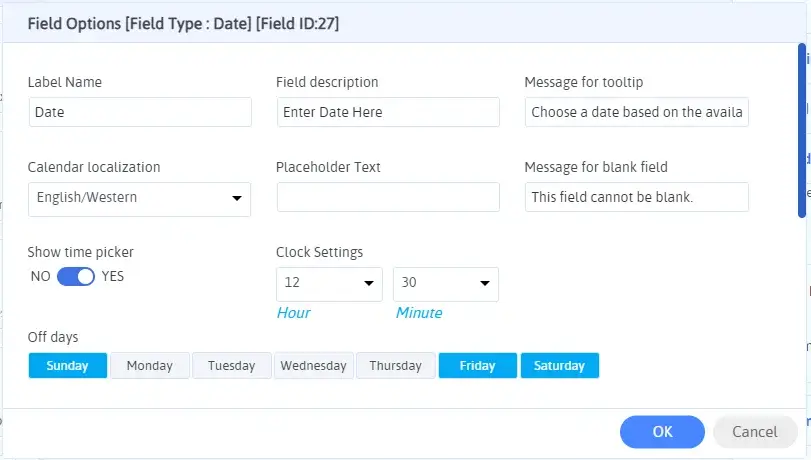
Once you add the date field, you get an exclusive option of settings by hovering above the field. To edit the date field features smoothly, click on settings.
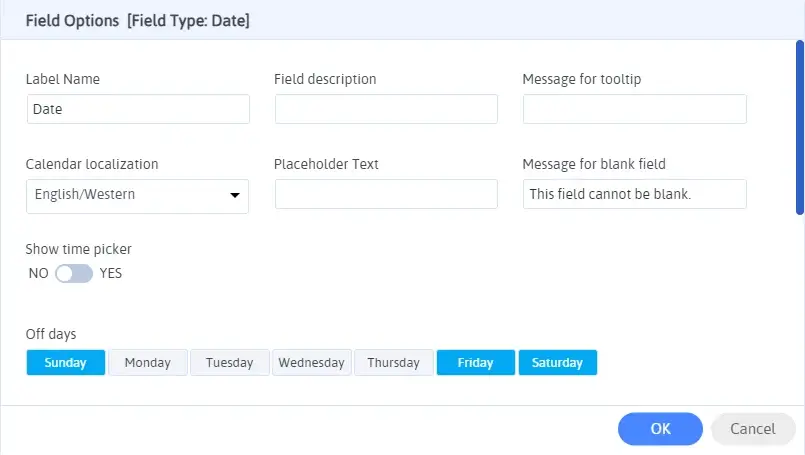
- From these settings, you can easily set the label name and description if required. Adding a tooltip as well can enhance your form.
- Further, you can select the advanced Calendar Localization based on the group of people who interact with your business.
- When you select the option of ‘Show the Time Picker’, date and time can be swiftly chosen by a user together. We shall explore that feature as well afterward here.
- Now comes the selection of off days. Choose the days you don’t want anyone to pick from the calendar for smooth business function. I have chosen Friday, Saturday, and Sunday as off days for your understanding.
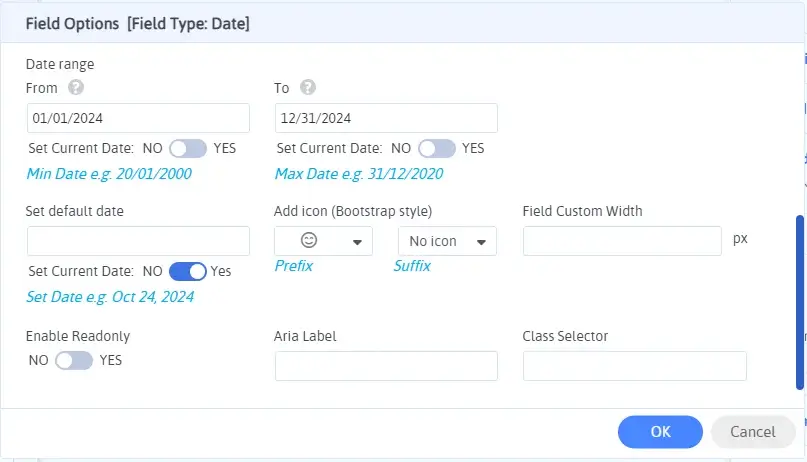
- Now, you can simply choose a date range in which you want the users to select the date.
- Further, you can also choose a default date, prefix, suffix icon buttons, field width, labels, and any other advanced features that you would want to activate.
- Select on OK for saving the form easily.
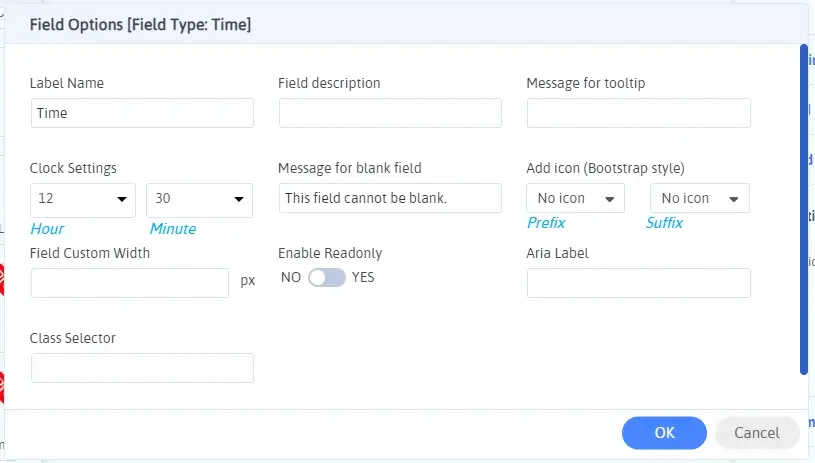
Now, just as we added the date field and clicked on settings, simply add the time field. Further, click on the settings option to edit and explore the advanced features.
Edit the settings based on your requirements to perfect the form. Choose the 12 or 24-hour format for the field as per users simplicity.
Now, all you have to do is click on Save Form and it will be perfectly ready to use.
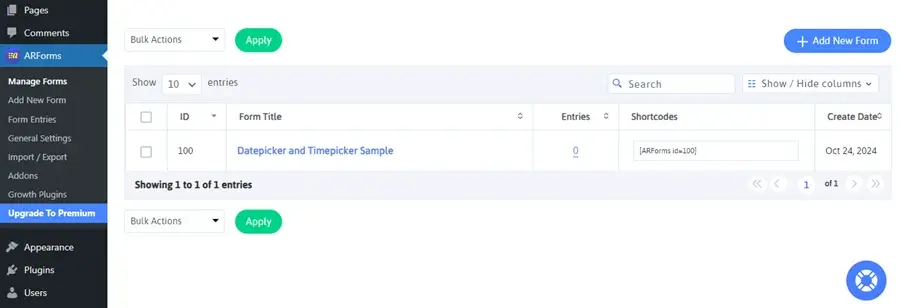
Step-6 Copy and Publish the Form
After saving the form, go to Manage Forms. Here, you will see our created form. Now, go over the shortcodes and click on it to copy it easily.
Choose a specific page, post, or location to display the form on your website to make it publicly accessible. There, paste the shortcode and publish/update the page/post and your form will be ready in no time.
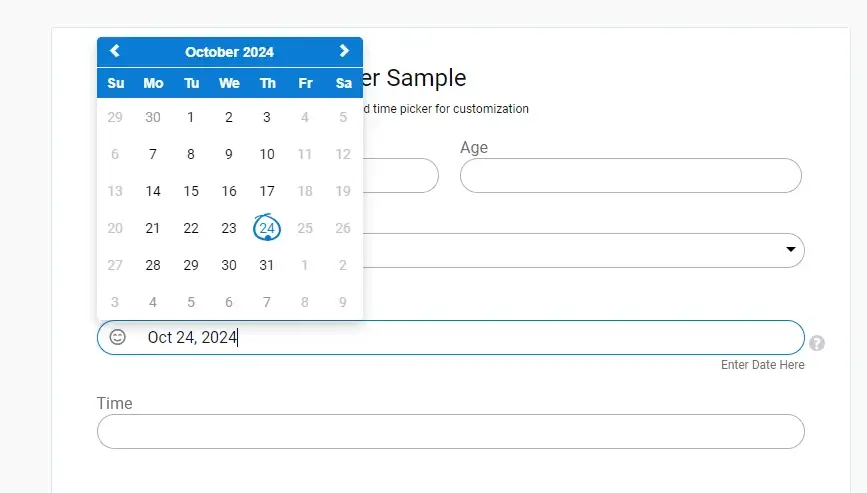
Check how the date picker deactivates Friday, Saturday, and Sunday as per our settings and displays the current date as well. That’s what an advanced and perfect form looks like.
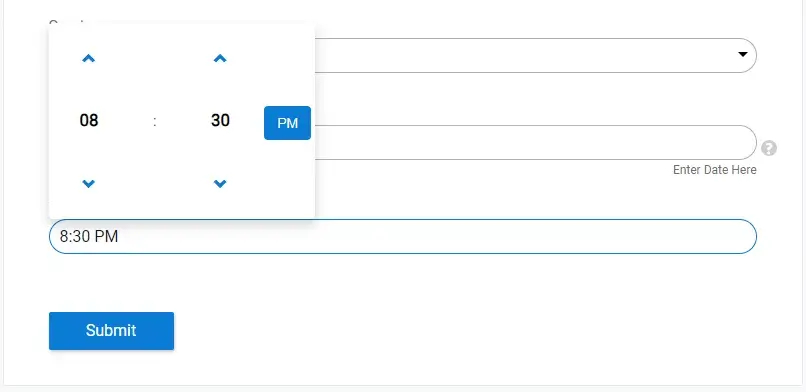
Based on the selection of a 12-hour format, the time-picker is accurate and works well.
Now, let’s edit our form for merging the date and time-picking tasks smoothly. For that, go to manage forms and click on the edit icon to edit the form.
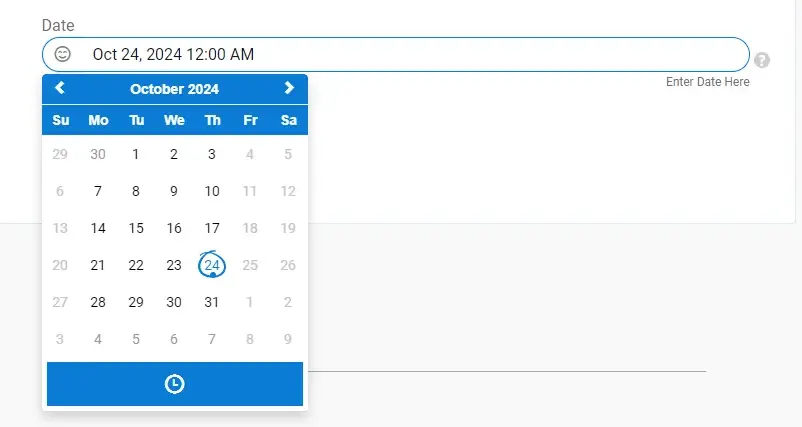
Delete the time-picker section and go to the settings menu of the date-picker tool. Activate the time picker option and set your format. Save the form and refresh the post/page/location where you passed the shortcode for a perfect output using just one tool.
Check how you can access the calendar as well as the time-picker tool from one place itself. Here, you can set a very particular feature. That is its format of twelve or twenty-four hours.
This is a time-savior if you want to allow selection of any time for your service!
Wrapping Up the Difference Between Date and Time Picker Tools
This very teeny-tiny tool changes your data collection game. It helps you in your scheduling work. Using this with tools like ARForms is the best for basic booking and scheduling by creating a Registration or Booking Form.Are you looking for more advanced features and suggestions? Go through our blog to find out the best of the world of WordPress and be inspired.
FAQs
1. What is a Datetime Picker?
A datetime picker is a tool that allows you to select both, date and time from a single field. With ARForms, when you select the show time option along with the date field, you are essentially using a datetime picker.2. What is the use of a Time Picker?
A time picker is helpful when exact time is of the essence. For instance, during a meeting scheduling, delivery slot selection, online class, or a service time selection. It provides both the parties with a clear time slot so that their schedules can be arranged accordingly.3. Can I create a booking form using datetime picker?
Yes, definitely. A booking form is essentially classified as booking because of the date, time, and service selection. You can leverage ARForms and create an advanced booking form and also integrate it with your calendar to manage appointments smoothly.