How to Create a Simple Contact Form in WordPress Easily
To put it simply, a WordPress Contact Form will connect you and your customers for further business discussions. You would have seen many educational websites, online businesses, and consultants that have a customer contact form for feedback or inquiry. Similarly, for your online business, you must create a contact form.
But why? If not, how will a customer send an inquiry? How will they get to know insider information? For online businesses, a contact form is the replacement for face-to-face conversations. You can get customer queries and respond to each of them individually.
We shall start creating a simple form by clicking on the button of Add New Form.
Step – 6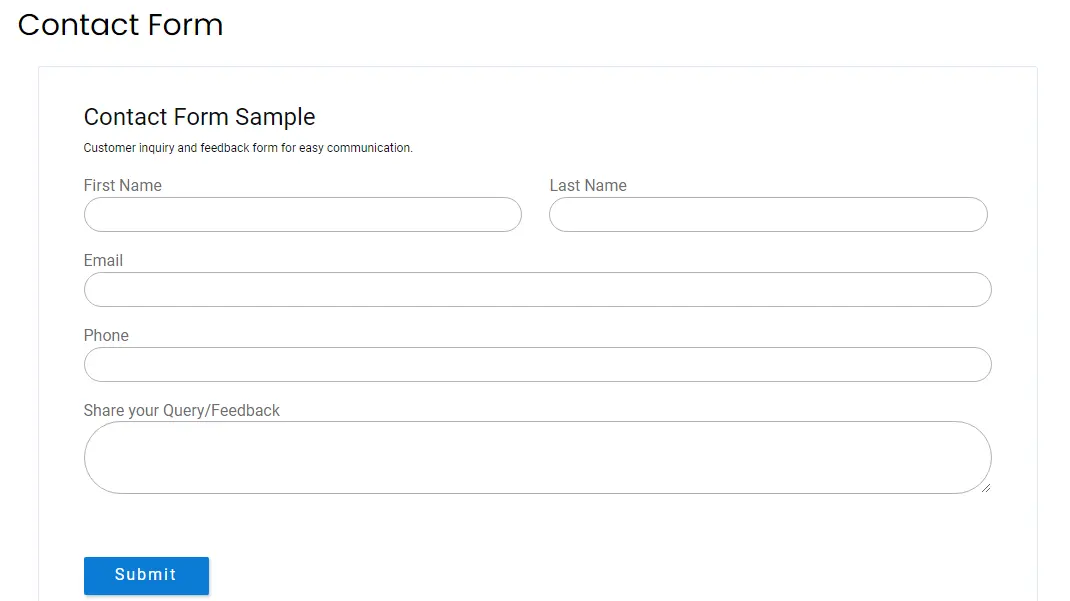
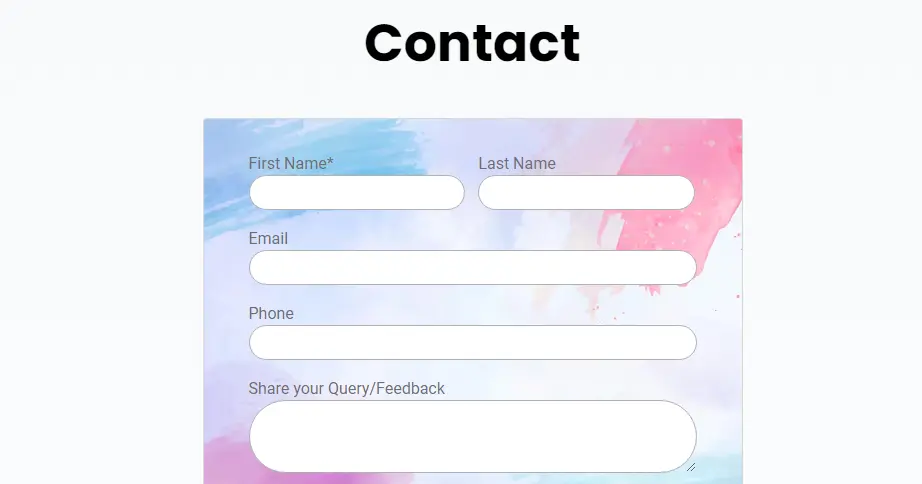
The contact forms are going to change your business game and set a great way of communication. Let the audience know about your achievements and difficulties in setting up forms for business.
Read These Also:
But why? If not, how will a customer send an inquiry? How will they get to know insider information? For online businesses, a contact form is the replacement for face-to-face conversations. You can get customer queries and respond to each of them individually.
What Exactly is a Contact Form?
A WordPress contact form is basically a form with fields for Name, Email Address, and Query/Feedback. A customer would be able to reach out to you by filling the form. But can there be other types of Contact Forms? Yes, why not? You can design your contact form based on your industry and requirements.- Create a Job Application Form if you’re a hiring platform
- Create a Digital Downloads Form for selling digital products
- For a Blog, create a Comment Form to receive feedback for your writing
- Create a Quote Form if you’re a service-based business so you can guide your clients about pricing
- Use an Event Registration Form to get event sign-ups and send follow-ups
- Create an appointment booking form for clients to book their slot with preferred/available date and time
WordPress Contact Form Benefits for a Safe Business
- Be Safe from Spam: The bots can smartly detect the email address on your website and fill your inbox with a lot of spam. Providing your number as well can lead to a lot of prank calls, fake calls, or simply spam. In this scenario, a contact form does the work without revealing your mail ID. Further, the best contact form plugins come with built-in reCAPTCHA and spam protection methods. So, it is crucial to block contact form spam WordPress.
- Complete Information: In an email, there are chances of receiving incomplete information. A customer can get overwhelmed as to what to write and how to address a query. With a well-designed fast secure contact form with clear fields, the customers know exactly what to say. You too as a business receive complete information, thus, solving queries on the fly.
- Customization and Automation: You can customize a contact form for any information you need to receive. Create your own fields and automate the workflow for your helpdesk. It’s a very simple and effective solution.
Setting Up ARForms Plugin for a Quick Contact Form Creation
ARForms is the contact form WordPress plugin that can be used for free from the WordPress Plugin repository. You do not need to create an html contact form or use any contact form html tags. Just an easy drag and drop feature!Step – 1
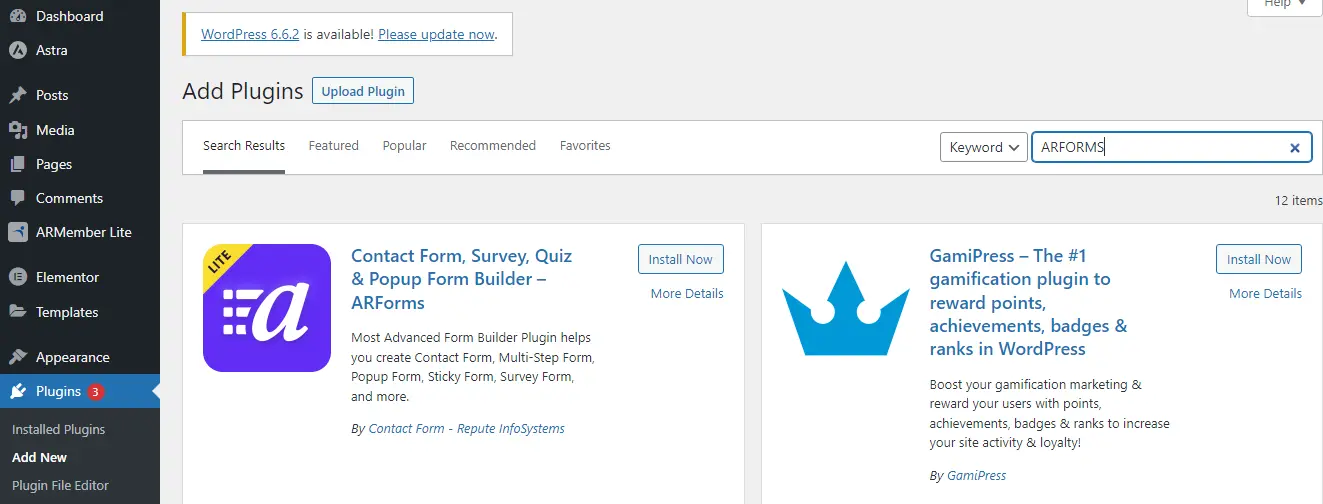
Open your WordPress Website Dashboard and Click on the Plugins Menu. Click on the Add New Button and type ‘ARForms’ in the search box.
Step – 2
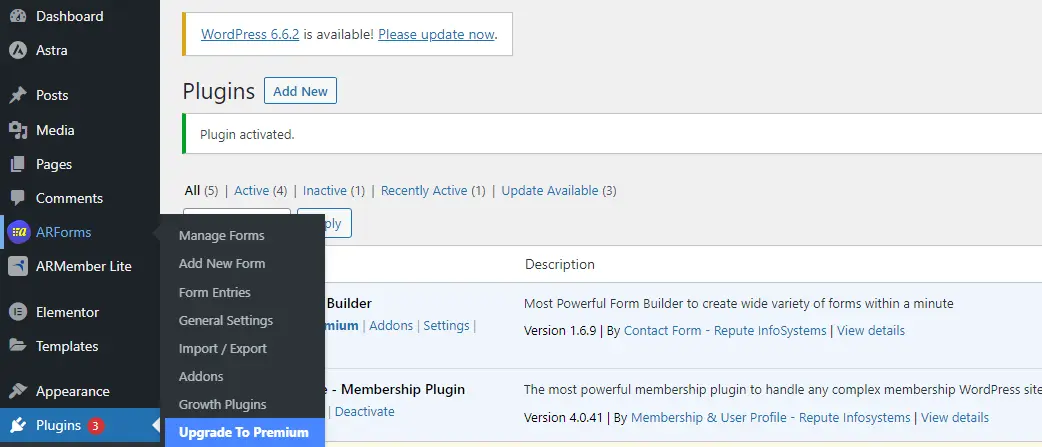
Click on the Install Down Button for ARForms. Further, you will get the option to Activate it. After the activation, you will see ARForms on your left-hand side panel with all its Lite Features.We shall start creating a simple form by clicking on the button of Add New Form.

Step – 3
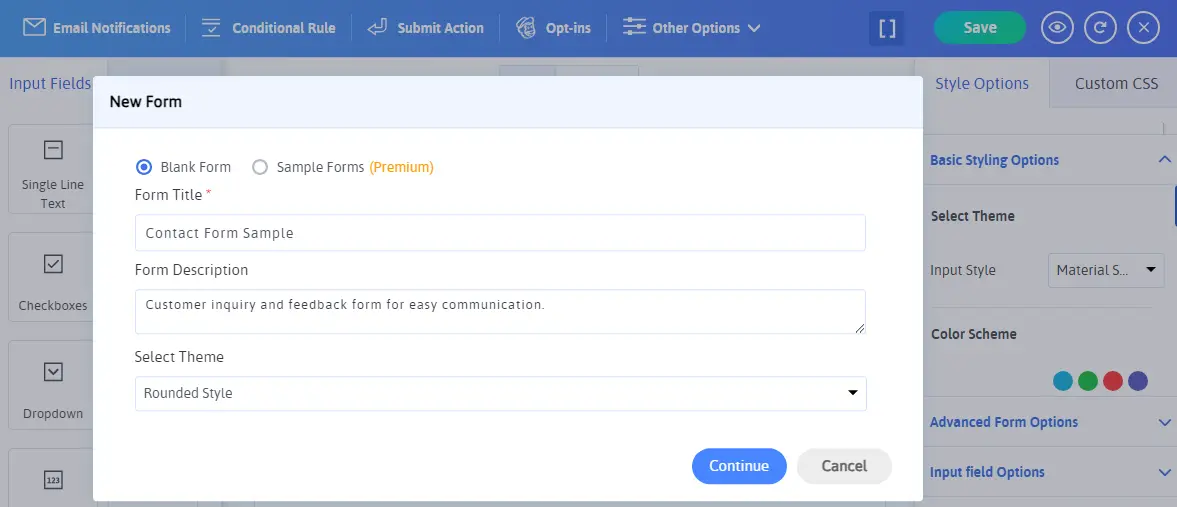
You will get a pop-up to fill in some basic form details like the form title, form description, and theme of the form. You can choose from Standard Style, Material Style, and Rounded Form. Click on Continue to create your first contact form.
Step – 4
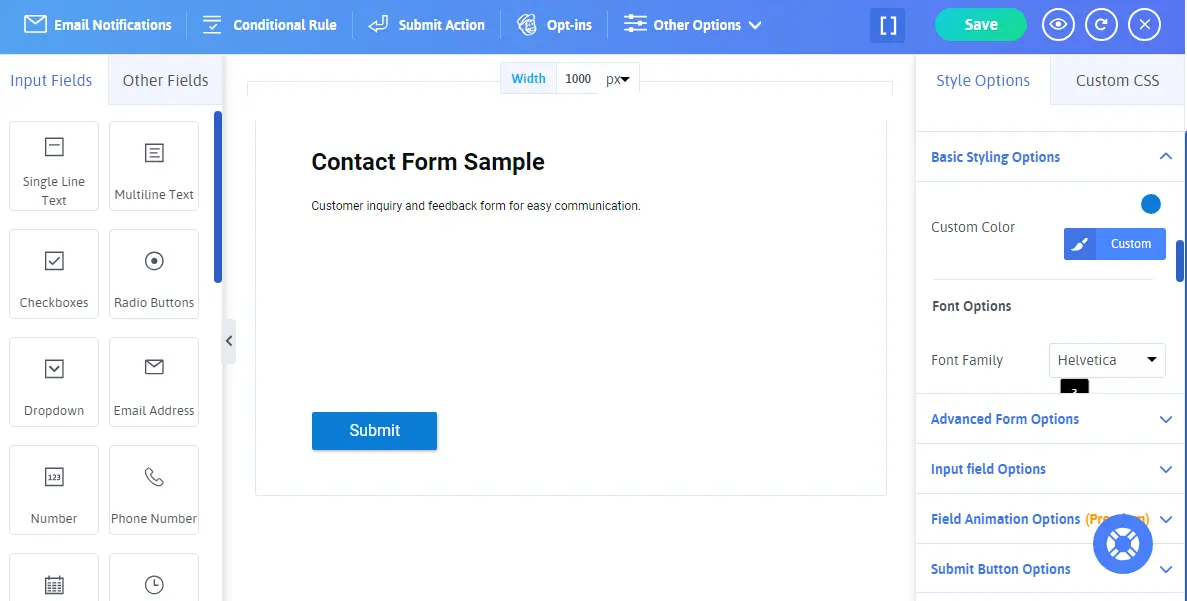
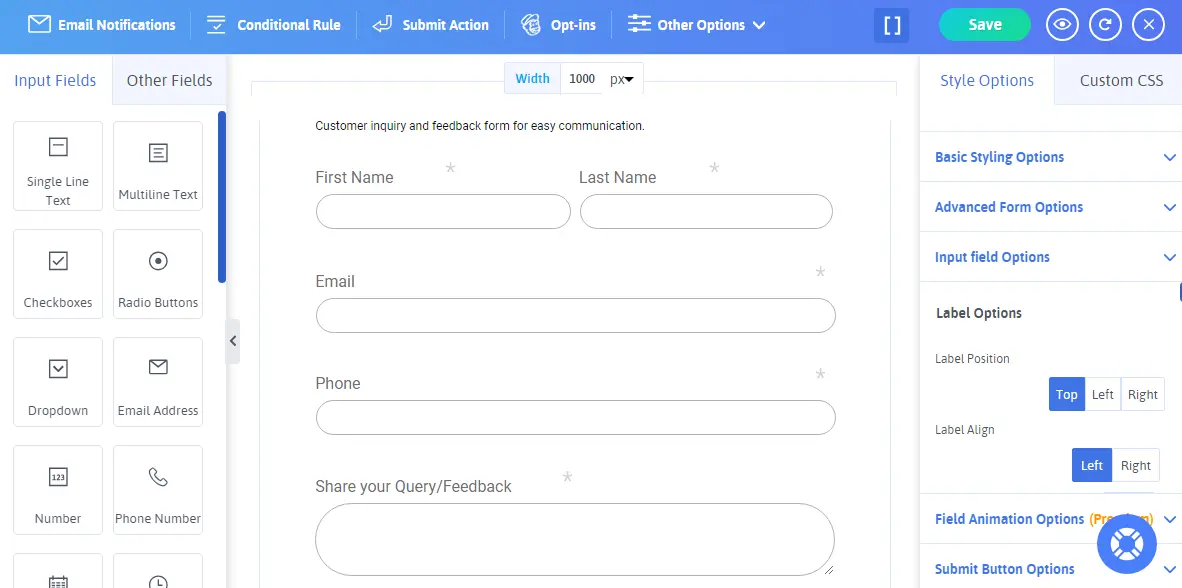
Now, you have multiple input fields and styling options to create your form. Let us get to it one by one and create our form.
- Firstly, you can easily change the width of the form from top of the page to suit your needs. The default width is 800 pixels which I have changed to 1000 pixels.
- Next, we are aiming to have five fields for a Contact Form. First Name, Last Name, Email Address, Contact Number (Optional), and Feedback.
- For Name, we shall select the Single Line Text from the left side panel. Replace the text single line with the First Name. Similarly, add the Last Name Single Line Text.
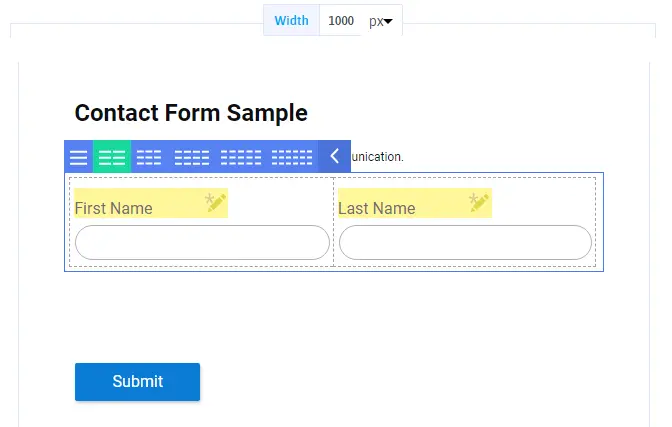
- To place the first name and last name side by side, hover over the first name field to see the grid options and choose the double grid. Further, you can use the drag-and-drop feature to move positions.
- Now, we will choose the Email Address and Phone Number field from the left side panel. These fields are customized for getting the specific information.
- For the query, choose the multiline text box and rename the heading with Query/Feedback as per your requirements.
Step – 5
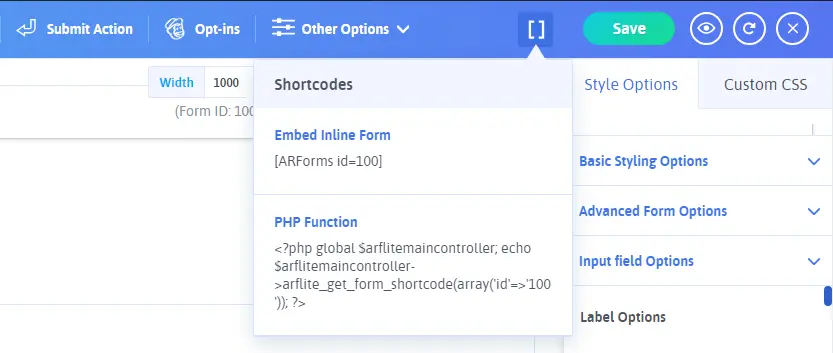
It’s done! You just have to click on the save button at the top-right corner. Further, click on the bracket beside the Save option. It will give you an ‘in-line shortcode’ or ‘PHP function’ to implement. Copy the inline shortcode from here.
Step – 6
- Choose the location to display your contact form and add a new post or a page. You can edit it if you want a contact form on any current page.
- Click on Add New Page/Post
- Add the Page title, paste the copied shortcode, preview the page/post, and publish it.
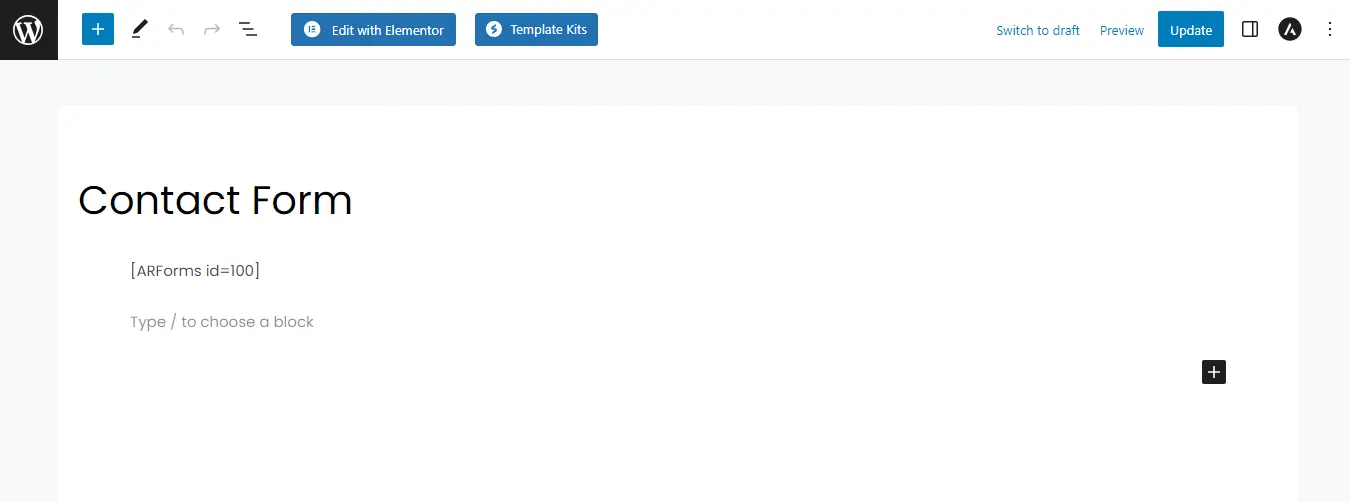
- The final output of the process will look something like the image added below.
- Now, to make any changes, just update and save the Form. All the changes will automatically get updated here without needing to paste different shortcodes again and again. Isn’t it amazing and super easy with ARForms setup?

ARForms Customization and Styling
With the above steps, we built a basic form. Now, let us learn to customize and style it for a better outlook. We shall look at other details as well for form fields. Go to Manage Forms from the left side panel and select the contact form. We will make changes to the same form.
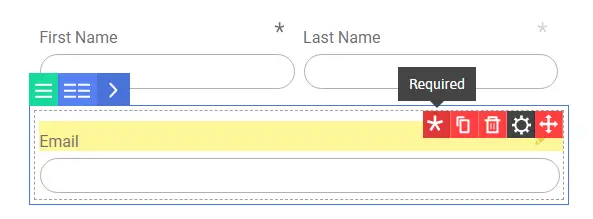
- When you hover your cursor over any field, you get a few options. The first one is an asterisk mark. If you want the user to compulsorily fill the field, activate it. If the field is optional and you can do without that information, keep it inactive.
- Here, you can see that the Asterisk Mark is active, dark grey for the First Name, and inactive, light grey for the last name.
- The next option is to copy a particular field and delete a field. The last option is to move a field and drag-and-drop it as per your choice.
- Now, we will look at the Settings option as it opens up to a new pop-up with various field settings.
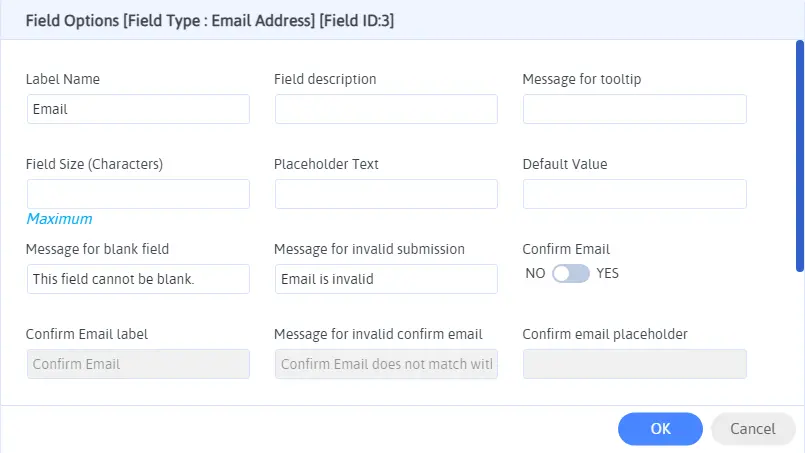
- In this pop-up, you can specify a lot of things for a field. You can change the label name, add a field description, or activate a tooltip. Further, based on the field, there will be other options that you can explore.
- Now, let’s come to the styling options. You can change the color scheme and style of your form. Choose to display or not the title and description of a form, set alignment, margin, background image, set border size, type, opacity, submit button options, and so much more.
- Further, you can experiment with using Checkboxes, Radio Buttons, and Dropdowns for a more interactive form.
- Your form can look something like this and more. Your imagination is the limit when it comes to editing and styling with ARForms setup.

Best Practices for Creating User-friendly Contact Forms in WordPress
There are some things that you must keep in mind for user-friendly contact forms in WordPress. Let’s have a brief look at them.- Keep it Simple: Make sure your form is simple to grasp and understand. Do not put any complex fields or words that can confuse the visitors and put them off. Keep the form very short, to the point, and easy.
- Test the Form: You must preview and test your form to check whether it is working smoothly or not. Are you receiving all the entries on your AForms dashboard or not? This will make sure that there’s no hiccup on the user’s end for a seamless experience
- Mobile Responsiveness: Check your forms from mobile devices as well to see if they look perfect or not. With ARForms, you need not worry as it is mobile responsive by default.
- Instructions and Error Messages: Use the option of Field Description and Tooltips to give clear instructions. Set an error message from the field settings to guide the users in the right direction.
- Integrate With Other Tools: As we all know, Online forms are more than just a way to collect information. They can be used for data collection, connecting with customers, and also to enhance user experience. Whether you are collecting feedback and queries, requesting a service or making an appointment, Integration with other tools and platforms can help you improve productivity, enhance efficiency and keep everything connected.
For example, If you are running a repairing business or website, tools like RepairBuddy can work alongside your forms. It can turn a simple request into a full workflow by tracking tasks, updating status, receiving customer feedback along with payments as well. These integrations can lead to better workflow and long term success for your business.
Wrapping Up the Creation of Simple Contact Form in WordPress
Wasn’t this too easy! You do not have to apply any coding knowledge to get beautiful, seamless, and customized forms. Use the ARMember Lite version to power up your contact forms for free. Make sure to follow all the steps thoroughly and keep the best practices in mind.The contact forms are going to change your business game and set a great way of communication. Let the audience know about your achievements and difficulties in setting up forms for business.
Read These Also:
