The Complete Guide for Adding an Image to your WordPress Forms
If you are running an online business built-in with a WordPress website, then at some point you will want to display and show various types of forms such as contact form, survey form, order online form, quiz form, newsletter form, signup/login form, or any other type of form depending on your business and industry niche.
Especially, for some types of WordPress forms have a glance, you will want to show the image options for your WordPress website visitors so that it could give them a better visualization of what your WordPress form is exactly about?
Instead of just showcasing the text options, displaying the images can make your WordPress forms visually more appealing. Rather, doing so can help you to improve the response rate for your created form and can enhance the form conversions as well!
In this article, we will walk you through a step by step method for how to add an image to your WordPress forms with the use of the ARForms WordPress form builder plugin.
Let’s get started!
How to Add an Image to your WordPress Forms Using ARForms WordPress form builder plugin?
Adding a custom image in the Radio Button and checkboxes
Amazingly, the ARForms WordPress form builder plugin offers a great set of features of adding custom images in the radio button field option as well as by using the checkbox option.
Adding a custom image option in a Radio Button
Luckily, with the use of ARForms WordPress form builder plugin, while creating the forms, let say for example, if you want to create a quiz form or an online order form where you need to display the product images, then in such case, you will need to make use of the custom image in radio button option which is a great feature offered within ARForms WordPress form builder plugin.
First, we will let you know how you can implement the images in the radio button.
For that, you will have to follow the below-given steps to easily apply the custom images in the radio button option.
Initially, when you are at the dashboard of ARForms, you will see the various input field options and other fields option on the left side of the ARForms WordPress form builder that provides you with the simple and easy to use options with a really easy to use drag and drop option.
Here are the steps to add a custom image using the radio button option in the ARForms WordPress form builder plugin:
Let’s have a look at the image below that shows the order online order form with a custom image in the radio button!

Adding a custom image option in the Checkbox
Just as the ARForms WordPress form builder plugin allows you to add the custom images in the Radio buttons, so does it offers you to add the custom images in the checkbox
This is how you can add the custom images with the use of the checkboxes field option.
Have a glance at the image that shows the Cake Order form in the ARForms WordPress form builder plugin:

Advanced Form Option (Background Image)
Best of all, the ARForms WordPress form builder plugin offers you the option to add the background image for your created WordPress form in the ARForms WordPress form builder plugin.
Adding a background image for your WordPress form can be the best way to visually appeal to your WordPress website visitors which can even be helpful to get more conversions from your WordPress form.
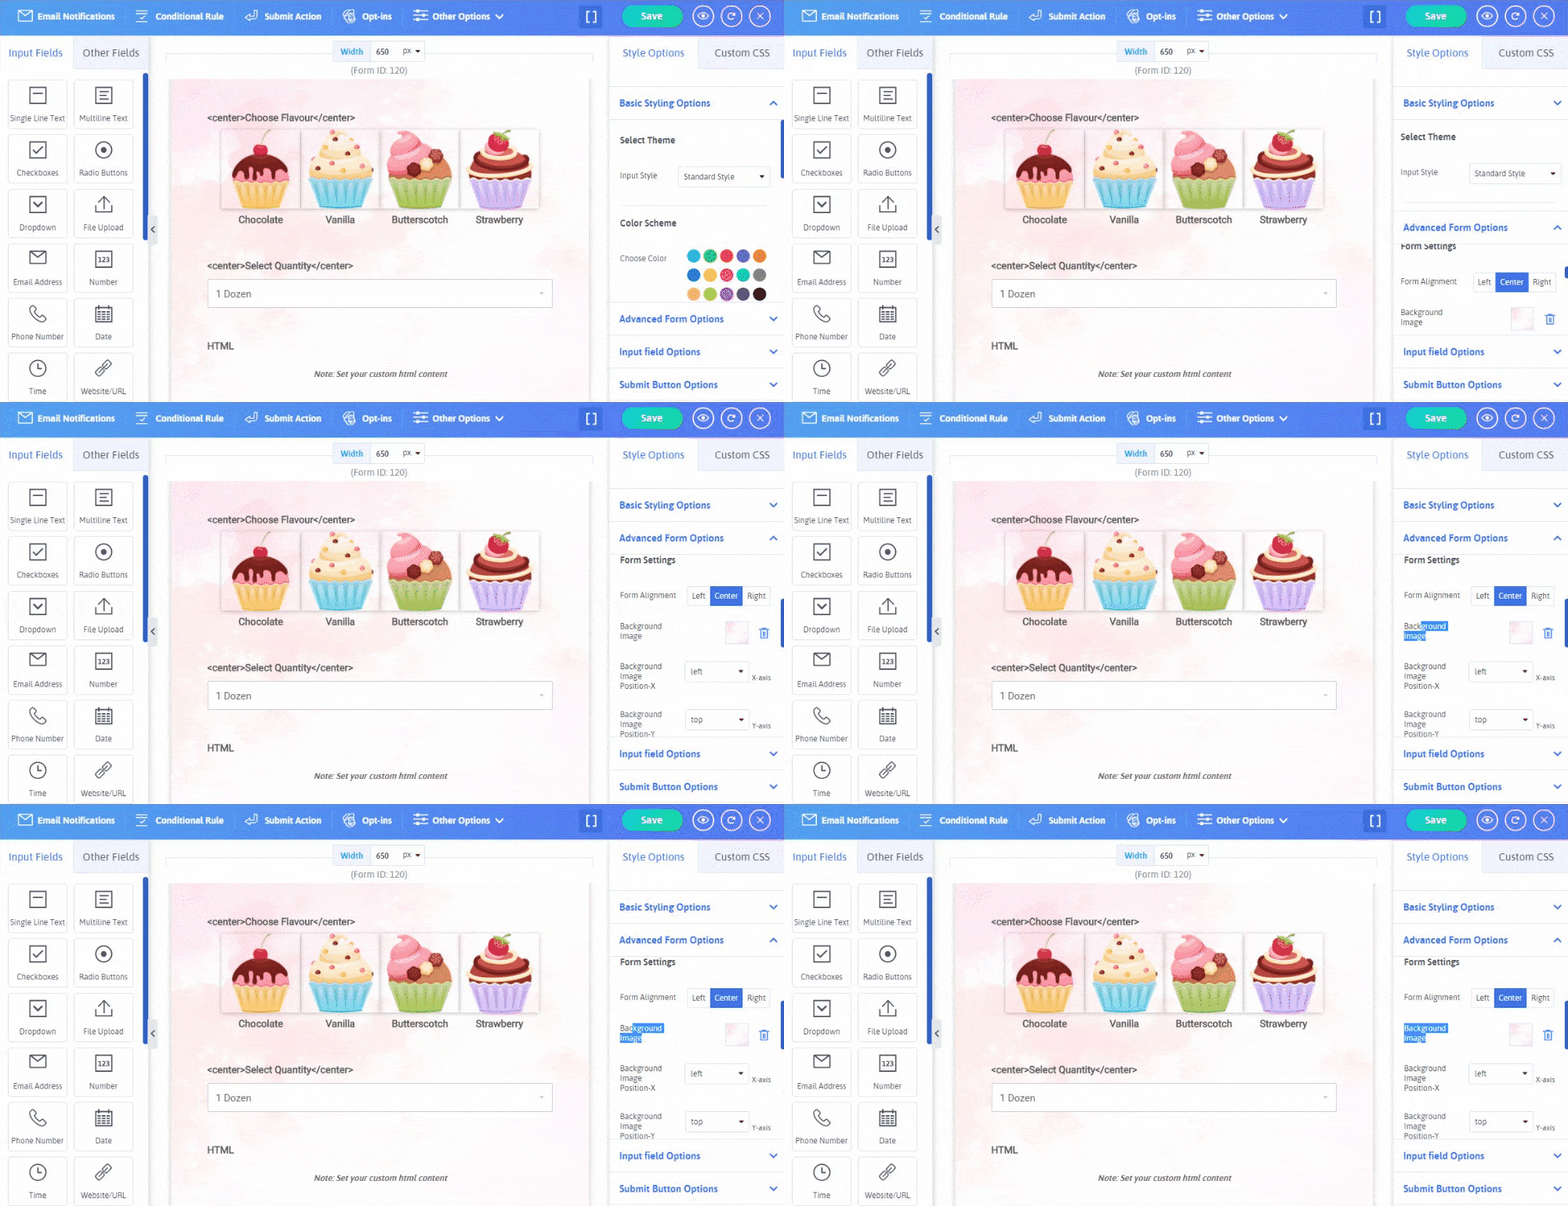
Now, if you simply want to add the background image in any of your created WordPress forms with the use of the ARForms WordPress form builder plugin, then you can easily do that by simply navigating to the Advanced Form Options that you can see under Style Options on the right side of the form editor in ARForms WordPress form builder plugin.
Have a look at the image given below to know how to place a background image in your WordPress form!
Submit Button Options (Background Image and Background Hover Image)
This is yet another great feature that you will find while you create your forms for your WordPress website using the ARForms WordPress form builder plugin.
With the submit button options, you will get a lot of options related to submitting button text and styling. Whereas there is a pretty cool option of selecting your favorite background image and even the background hover images as well.
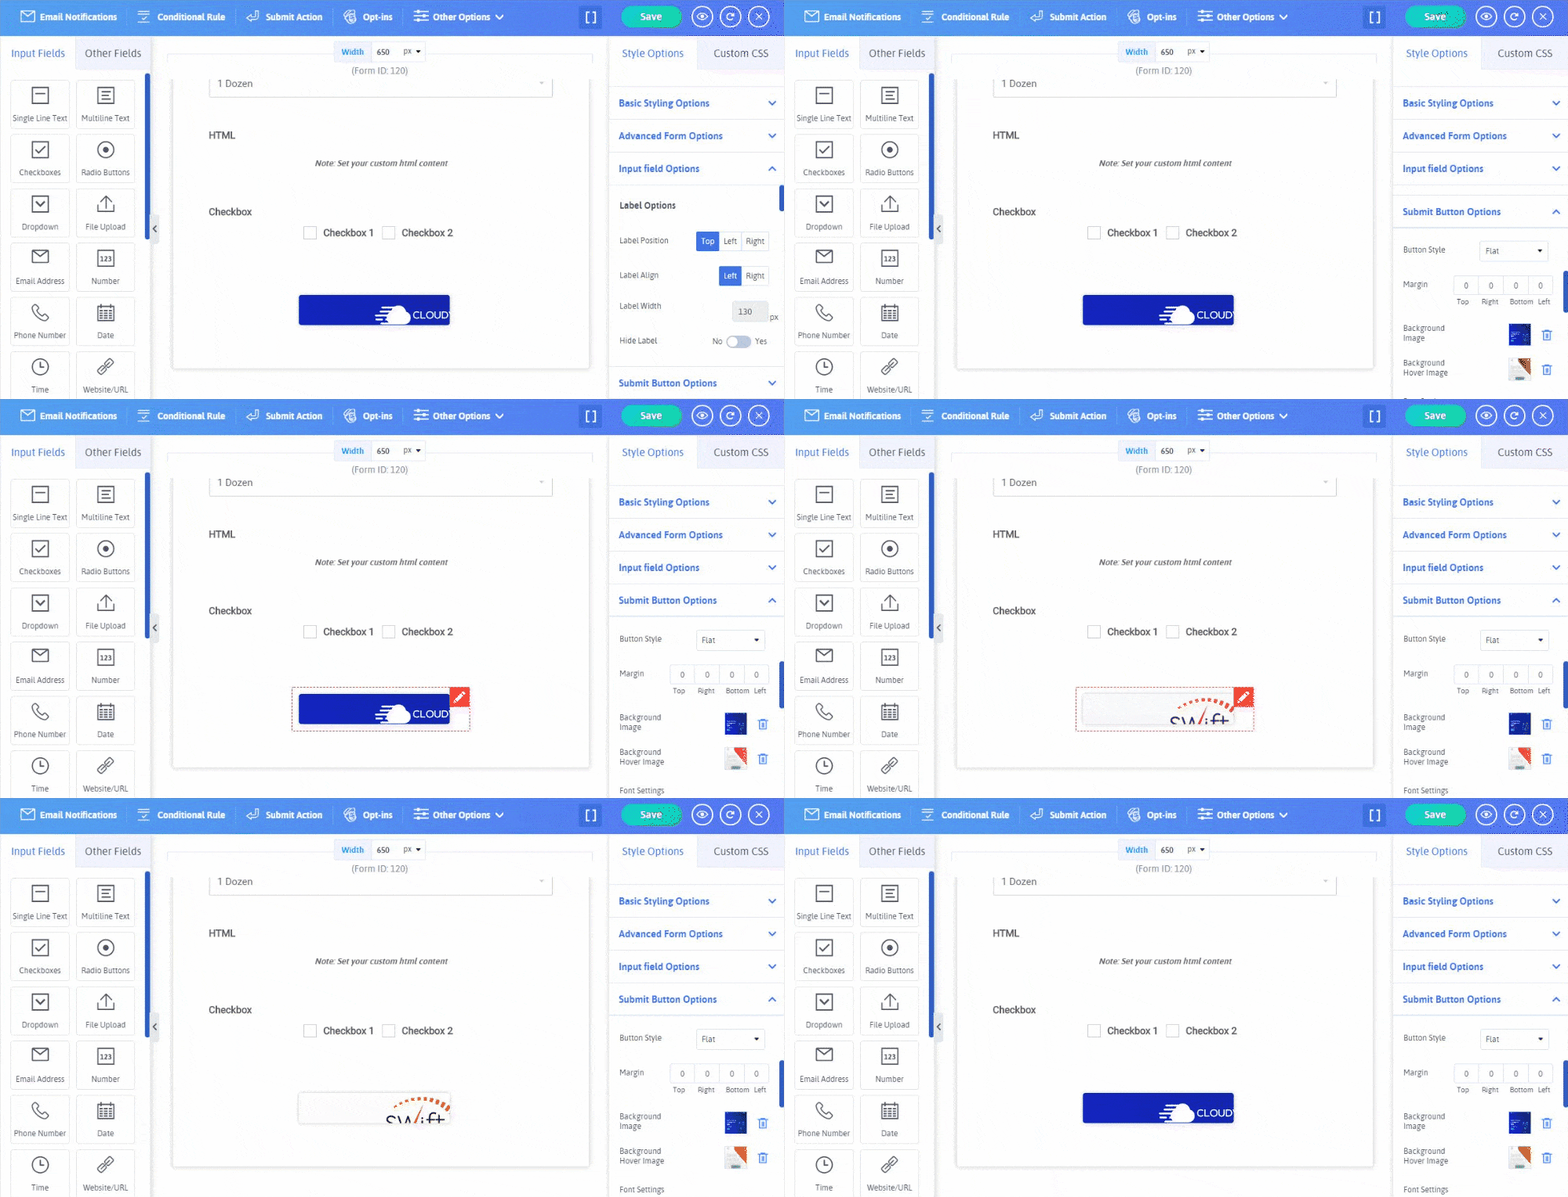
These submit button background image and background hover image can be useful to make your WordPress form quite appealing and can grab the attention of your website visitors.
What Else?
Apart from the above-mentioned image adding features in the ARForms WordPress form builder plugin, there are other options to add images on your WordPress form as well.
Let’s take a look at those other options to add an image to your WordPress forms
Other options to add Image to your WordPress form
If you want to add an image on your WordPress form other than the background image, or custom image in the radio button or custom images in checkboxes, then luckily, you have the option to place the image of your choice on your created WordPress form in ARForms WordPress form builder plugin.
So, first, we will show you how you can directly add the image by placing the image URL. For that, you will need to navigate to the Other Fields option that you can easily see on the left side of the form editor in the ARForms WordPress form builder plugin.
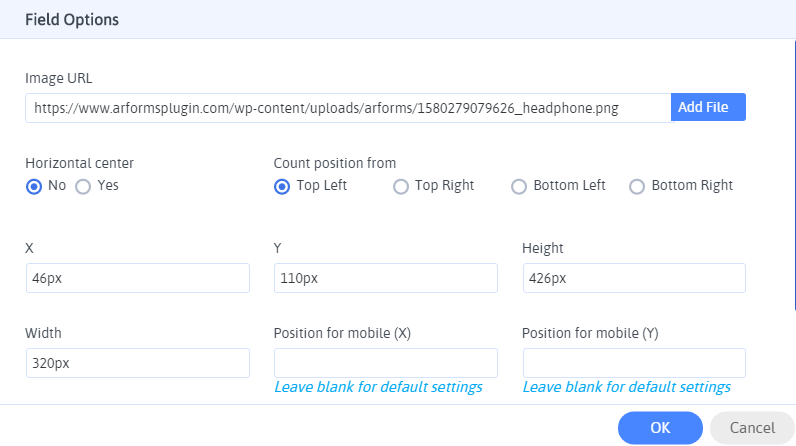
After you apply the image option, let’s say, for example, you are creating an online payment form of electronic products like headphones where you want to show a payment form along with the image of headphones on your WordPress website.
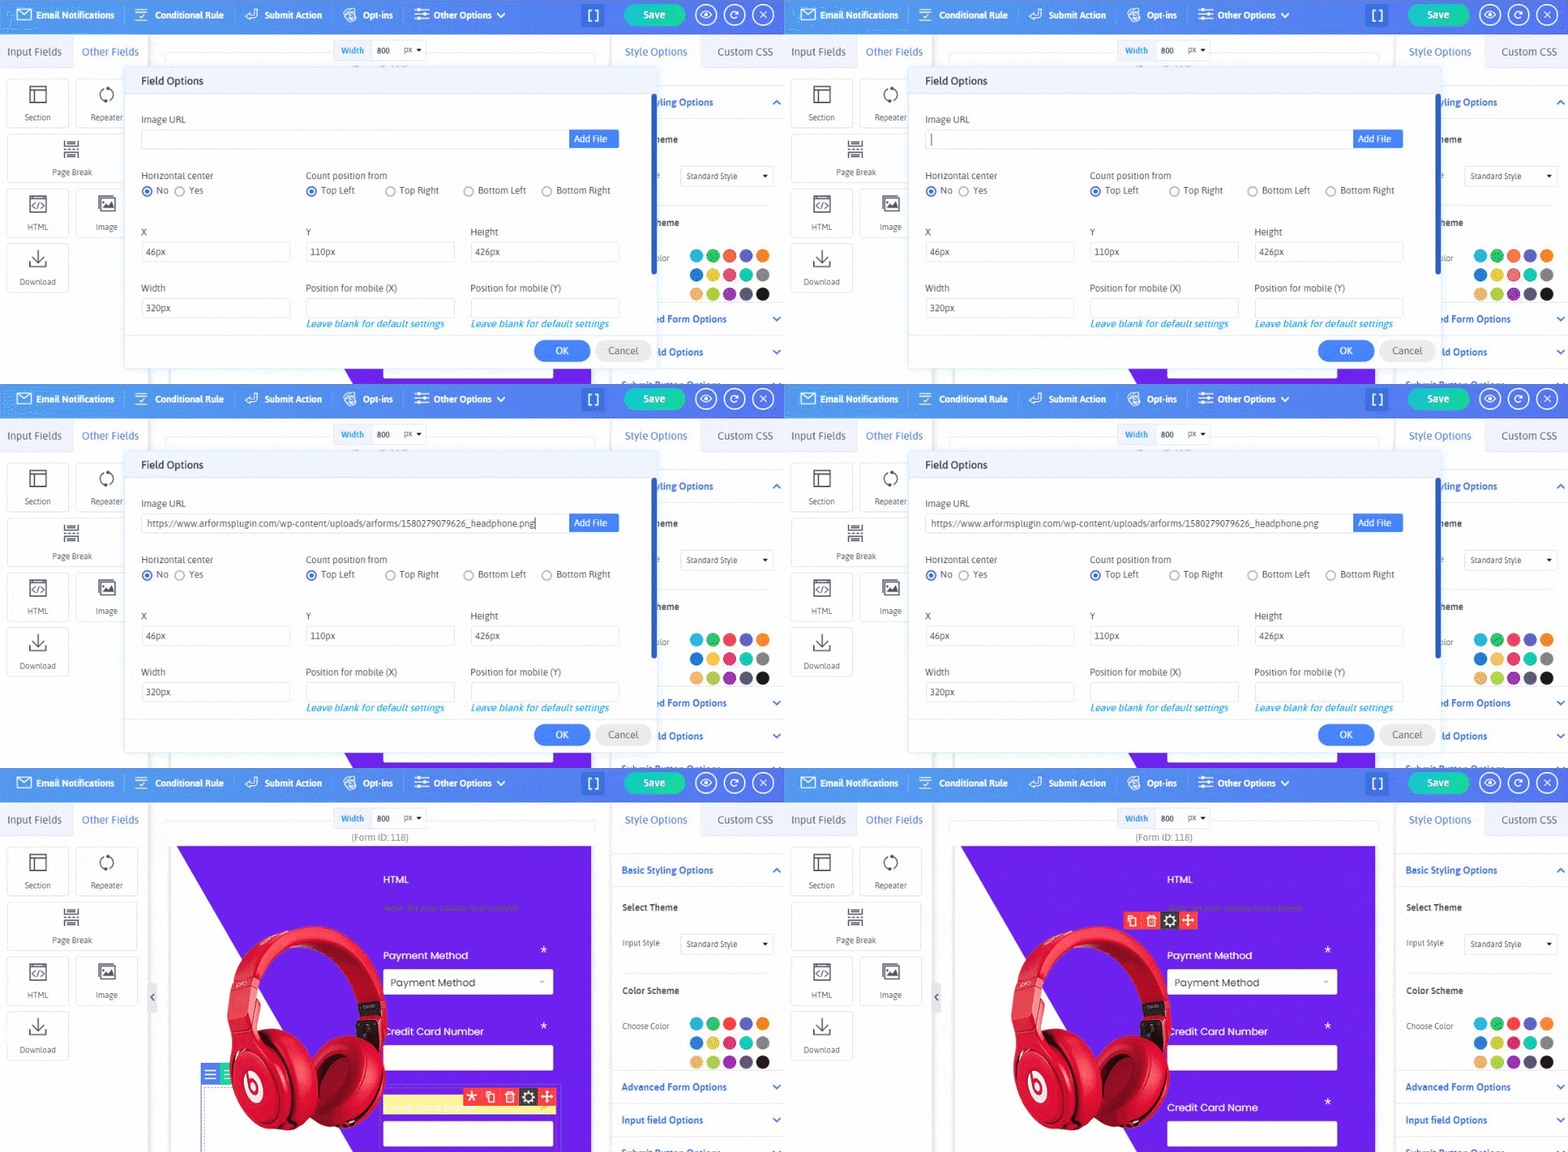
For that, you can easily add the image of the headphone simply by placing its image URL or adding your image file from your PC device in the image URL box in the field options.
Have a look at how you can apply the image using the URL option on your online payment WordPress form:
Final Thoughts
At last, after going through all the above-mentioned adding image options to your WordPress forms with the use of ARForms WordPress form builder plugin, you can rest assured, figure out by yourself the best suitable options to add an image as per the requirement of your WordPress forms.
If you found this article informative and insightful, then do share it across the social media channels so more and more people can learn and create the best WordPress forms to grow their business to the next level!
Especially, for some types of WordPress forms have a glance, you will want to show the image options for your WordPress website visitors so that it could give them a better visualization of what your WordPress form is exactly about?
Instead of just showcasing the text options, displaying the images can make your WordPress forms visually more appealing. Rather, doing so can help you to improve the response rate for your created form and can enhance the form conversions as well!
In this article, we will walk you through a step by step method for how to add an image to your WordPress forms with the use of the ARForms WordPress form builder plugin.
Let’s get started!
How to Add an Image to your WordPress Forms Using ARForms WordPress form builder plugin?
Adding a custom image in the Radio Button and checkboxes
Amazingly, the ARForms WordPress form builder plugin offers a great set of features of adding custom images in the radio button field option as well as by using the checkbox option.
Adding a custom image option in a Radio Button
Luckily, with the use of ARForms WordPress form builder plugin, while creating the forms, let say for example, if you want to create a quiz form or an online order form where you need to display the product images, then in such case, you will need to make use of the custom image in radio button option which is a great feature offered within ARForms WordPress form builder plugin.
First, we will let you know how you can implement the images in the radio button.
For that, you will have to follow the below-given steps to easily apply the custom images in the radio button option.
Initially, when you are at the dashboard of ARForms, you will see the various input field options and other fields option on the left side of the ARForms WordPress form builder that provides you with the simple and easy to use options with a really easy to use drag and drop option.
Here are the steps to add a custom image using the radio button option in the ARForms WordPress form builder plugin:
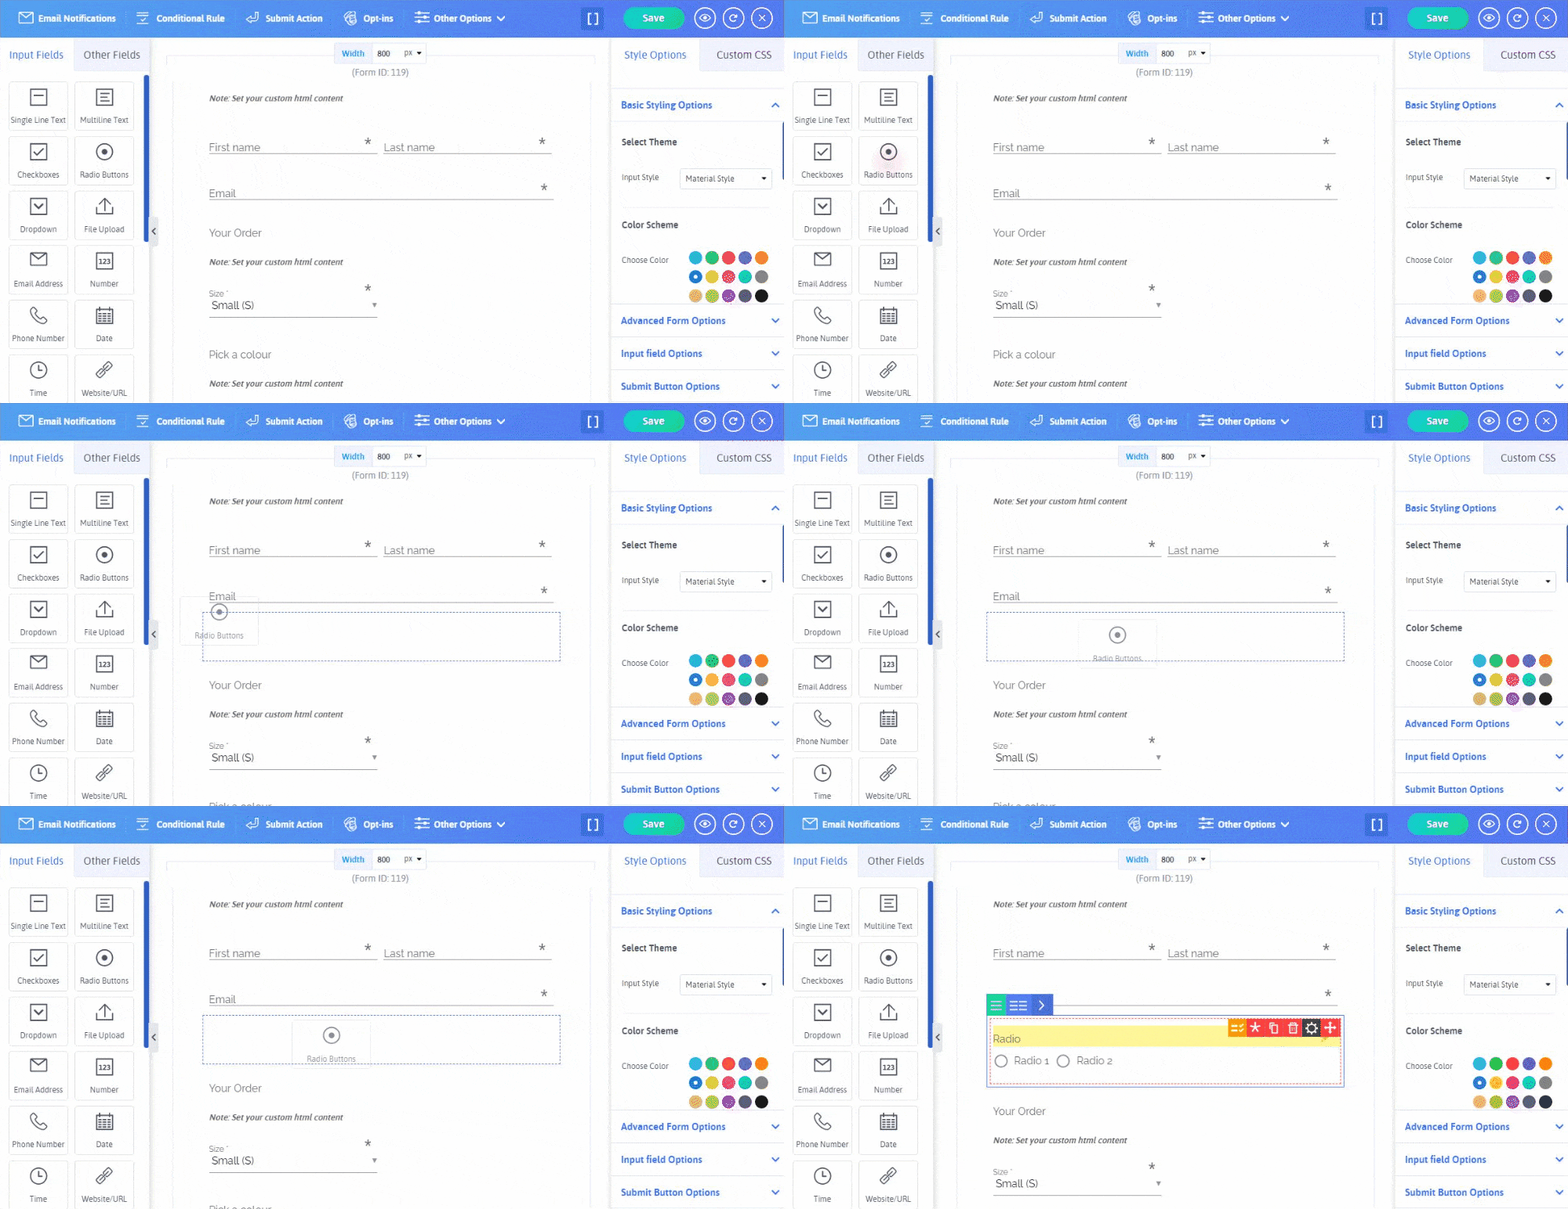
- First, you have to choose the Radio Buttons option that is placed on the left side of the form editor in ARForms
- You can simply drag and drop the radio button option and place it wherever you want on your Form
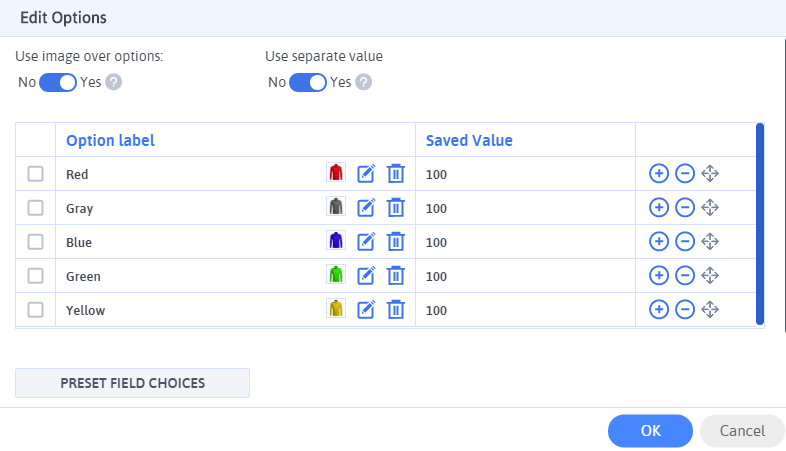
- After that, you can select the Manage Options which will show you the new popup screen where you can add multiple radio buttons by enabling the Use Image Over Options which will let you add your custom image for your selected radio button.
- Next, when you have completed adding the custom images, you can then click on the OK button. That’s it, finally, you will be able to see your added custom images in your WordPress form you are creating with the ARForms WordPress form builder plugin.

Let’s have a look at the image below that shows the order online order form with a custom image in the radio button!

Adding a custom image option in the Checkbox
Just as the ARForms WordPress form builder plugin allows you to add the custom images in the Radio buttons, so does it offers you to add the custom images in the checkbox
This is how you can add the custom images with the use of the checkboxes field option.
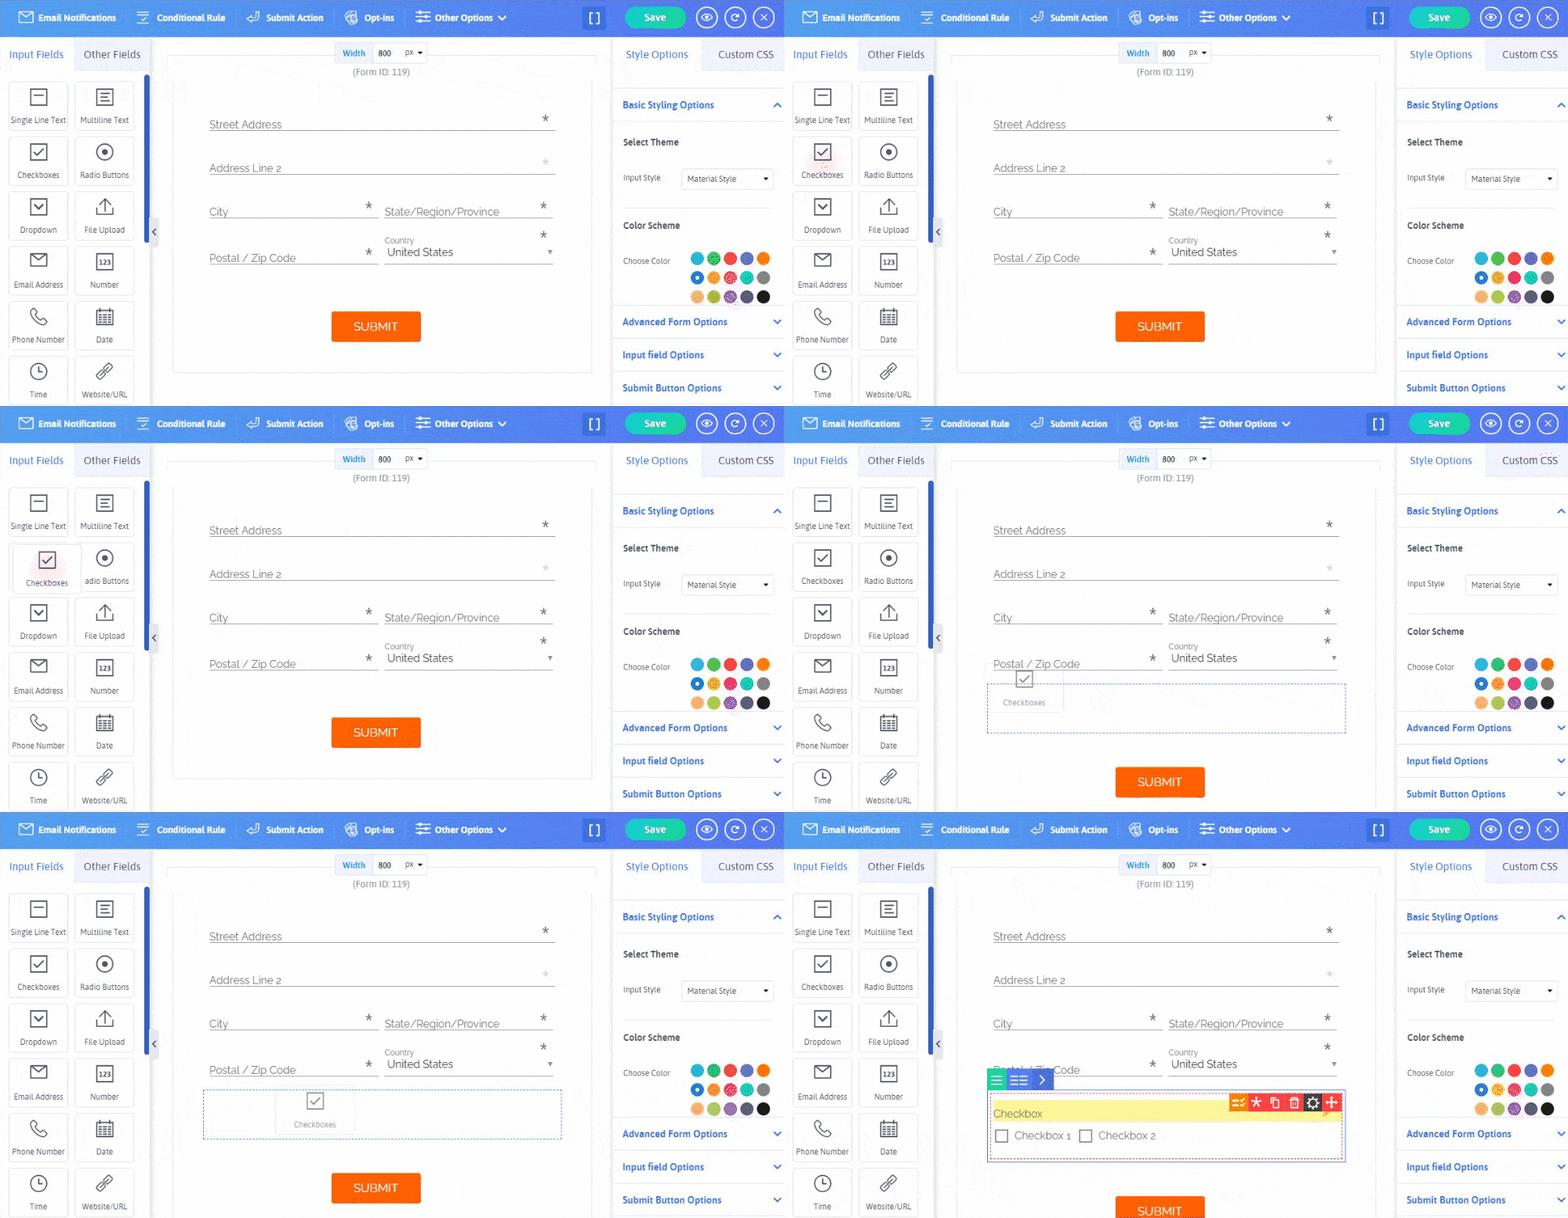
- From the ARForms WordPress form builder, after selecting your desired form template, or sample form, you will be able to see your form in the form editor of the ARForms WordPress form builder plugin.
- Then, from the input fields option, you need to select the checkboxes option, simply select or drag and drop it in your form to your desired place.
- Next, you need to select the Manage options which you can do by hovering on the checkboxes. You will be able to see a new popup screen with the Edit Options. This is where you need to first enable the “Use Image Over option” which will allow you to upload custom images for the checkboxes.
- At last, when you are finished adding the custom images in checkboxes, thereafter you can see the placed images on your created WordPress form.
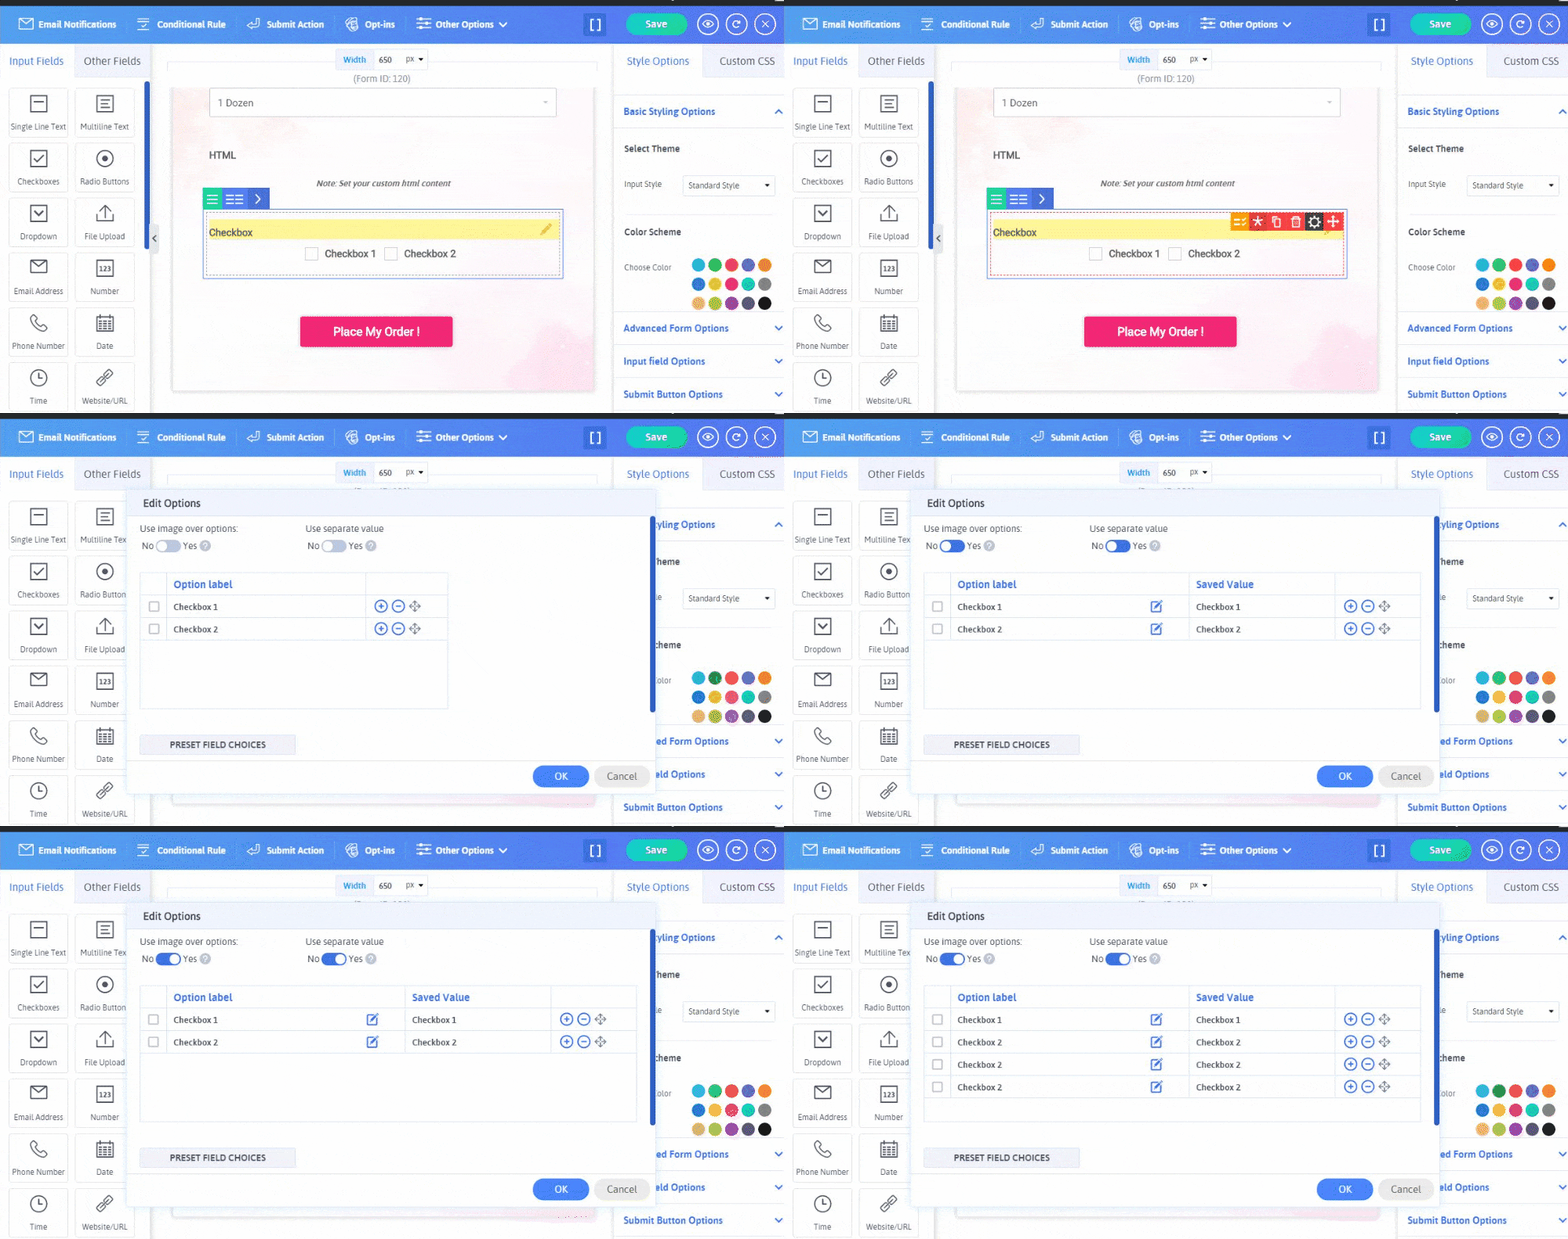
Have a glance at the image that shows the Cake Order form in the ARForms WordPress form builder plugin:

Advanced Form Option (Background Image)
Best of all, the ARForms WordPress form builder plugin offers you the option to add the background image for your created WordPress form in the ARForms WordPress form builder plugin.
Adding a background image for your WordPress form can be the best way to visually appeal to your WordPress website visitors which can even be helpful to get more conversions from your WordPress form.
Now, if you simply want to add the background image in any of your created WordPress forms with the use of the ARForms WordPress form builder plugin, then you can easily do that by simply navigating to the Advanced Form Options that you can see under Style Options on the right side of the form editor in ARForms WordPress form builder plugin.
Have a look at the image given below to know how to place a background image in your WordPress form!

Submit Button Options (Background Image and Background Hover Image)
This is yet another great feature that you will find while you create your forms for your WordPress website using the ARForms WordPress form builder plugin.
With the submit button options, you will get a lot of options related to submitting button text and styling. Whereas there is a pretty cool option of selecting your favorite background image and even the background hover images as well.

These submit button background image and background hover image can be useful to make your WordPress form quite appealing and can grab the attention of your website visitors.
What Else?
Apart from the above-mentioned image adding features in the ARForms WordPress form builder plugin, there are other options to add images on your WordPress form as well.
Let’s take a look at those other options to add an image to your WordPress forms
Other options to add Image to your WordPress form
If you want to add an image on your WordPress form other than the background image, or custom image in the radio button or custom images in checkboxes, then luckily, you have the option to place the image of your choice on your created WordPress form in ARForms WordPress form builder plugin.
So, first, we will show you how you can directly add the image by placing the image URL. For that, you will need to navigate to the Other Fields option that you can easily see on the left side of the form editor in the ARForms WordPress form builder plugin.
- When you select the Other Fields option, then you will be able to see the Image option.
- After you select the Image option or simply drag and drop it to your WordPress form, you then need to choose the field options, that is where you can put your image URL path or either add the image from your computer device. You also have the option to set the image size and position of your image.

After you apply the image option, let’s say, for example, you are creating an online payment form of electronic products like headphones where you want to show a payment form along with the image of headphones on your WordPress website.
For that, you can easily add the image of the headphone simply by placing its image URL or adding your image file from your PC device in the image URL box in the field options.
Have a look at how you can apply the image using the URL option on your online payment WordPress form:

Final Thoughts
At last, after going through all the above-mentioned adding image options to your WordPress forms with the use of ARForms WordPress form builder plugin, you can rest assured, figure out by yourself the best suitable options to add an image as per the requirement of your WordPress forms.
If you found this article informative and insightful, then do share it across the social media channels so more and more people can learn and create the best WordPress forms to grow their business to the next level!
